Thursday, January 31

1 Chicken Dish Three Ways (freezer friendly)

So today is Jan 31st.  Happily February (my birthday month) starts tomorrow, and the cooking magazine my hubby surprised me with has tons of cake recipes wahoo! Yes I make my own cake but it totally pays off. I totally don't mind especially if we go out someplace fun for dinner. Store bought cake is welll okay not really personal or fun... and my kiddo can't lick the frosting off the mixer's beaters if the store makes it. My hubby always asks for a choc cake because that's his "thing" but I like to mix it up. One of my fav birthday cakes of all time, was made maybe 10 years ago, a banana nut cake that my brother made while we were camping in a rv trailer with a dinky little stove and oven. hahaha! But really the focus of blogging today isn't cake, I am just really deep on a rabbit trail this morning. 


I really want to tell you about this three meals I made last week. It all started with a single freezer meal. Some chicken and ingredients for a marinade that I bought, prepped, and threw in the freezer for later. Easy!  


Meal #1: Grilled Chili Maple Chicken and veg
(serves 4 )
this recipe is directly taken from http://whenthedinnerbellrings.blogspot.com/2011/06/super-easy-way-to-getting-meals-ready.html
I didn't change or adapt the recipe. I doubled it. 

What you need for this recipe: 
3 lbs boneless skinless chicken breasts or tenders
4 Tb water
2 tsp salt
3 Tbs maple syrup (the good kind not the imitation)
2 Tbs chili powder 

Directions:  
1. Trim the chicken and cut into long strips approx 4 or 5 per breast, you can skip this step by buying tenders but usually that's a bit more expensive. (need approx 
2. Label your freezer bag with the title of the dish, date, and cooking instructions
3. Mix all the other ingredients together in a bowl. 
4. Put the cut chicken into a gallon freezer bag and pour the marinade over the top. 
5. Lay the bag flat in the freezer 

When you want to use it: 
1. Defrost it in the fridge the night before
2. Grill it up the next day approx 4 minutes on each side until done.
3.  Serve 3 strips per person with your favorite veg, rolls or rice to round out the dinner.


Meal #2: Chili Maple Chicken Quesadillas
Leftover meat is awesome for stews, casseroles and one of my favorite things CHEESY quesadillas!!! 
To round out this meal serve it with rice. You will have dinner done in less than 30 minutes!
Makes 4 


What you need for this recipe:

  • 1 1/2 strips of leftover chicken per quesadilla = 6 total depending on appetites (1 strip for kids)
  • 8 tortillas - 2 per quesadilla
  • 2 cups of cheese whatever you have around, i used shredded mozzarella
  • 1/4 red pepper, finely diced, divided into all 4 
  • 1 Roma tomato, finely diced, divided into 4
  • 1 jalapeno (optional if you like things spicy) 
  • 4 Tbs cilantro, divided 
  • 1/2 cup salsa, divided (1/8 cup each)
  • optional toppings: Greek yogurt or sour cream, chopped lettuce, salsa, sprouts, ect

Directions:
1. Lay out 4 tortillas. Put 1/4 cup of cheese on each one. 
2. Dice up the chicken strips and put equal amounts on each one. 
3. Put equal amounts of red pepper, tomato, cilantro and jalapeno one each one. 
4. Top with the remaining cheese, salsa, and the last tortilla 
5. Cook them in a quesdilla maker or on the stove. A long grill flat grill pan over two burners would do it all at once. I used a quesdailla maker to help me out. 
6. Cut the cheesy mouth watering rounds into 4 or 8 pieces on large plates with toppings piled in the middle


Meal #3: Maple Chili Chicken Supreme Pizza

The sweet nature of this chicken pairs so beautifully with red onions and chopped pineapple. I wanted to eat the whole pizza!  Since my family isn't quite into chicken pizza. They are missing out! So as you can see in this picture, I did half supreme and half pepperoni. So I am going to just double the amounts I used so you know how much you'll need for a whole pizza. 

                               What you need for this meal: 

1. Leftover Chili maple Chicken strips - 4 or 5, finely diced
2. 1 small can of pineapple  1 - 1 & 1/2 cups of finely diced 
3. 1/2 cup red onion, finely chopped
4. 1 1/4 cup of mozzarella cheese 
5. 1/2 cup pizza sauce
(click here for an easy recipe). 
6. Pizza dough 
(click here for an easy 10 minute rise dough)
7. handful of finely chopped cilantro 


Directions
1. Make the dough if not using store bought
2. Defrost the pizza sauce in hot water if you have some made or open it from a can 

3. Par bake the pizza rolled out on a pizza stone or pan for 3 minutes at 500 degrees

4. Turn the oven down to 450 while you top the pizza crust
5. Top the pizza with pizza sauce, 1/4 cup cheese, then chicken, onion, pineapple, cilantro, and the rest of the cheese
6. Bake the pizza at 450 for 8-10 minutes or until its golden brown


There you have 3 meals all from 1 Freezer Meal of chicken.... Easy Peasy. All three meals took less than 30 minutes to make with only a handful of ingredients. 
I really hope you enjoy these short cuts... I know I will do this again in the future with spring sports starting. 

Enjoy!
From my busy kitchen to yours! 


Wednesday, January 30

Almond Crusted Chicken & Rice

My week is in full swing. How is yours? I worked the last two days and today we went house hunting. I needed a good yummy meal that fit my unusual schedule and was easy. I don't usually go for the easy meals, but after walking around all morning with a three year old reminding him to "look with your eyes" in each model home, I needed an easy night in general. Just give me some dinner and a few short cooking shows and no one gets hurt! Yeah I am boring... limited interests food blog, recipes, cooking shows, food magazines, ect... Its just who I am. I am vegging. The timing of the food was important because I needed something I could make ahead of time for my hubby to take to work for his "lunch" but something that tasted good reheated for my son and I. Usually he takes dinner from the previous evening to work to eat, but the guys were on their own last night. So you can imagine not much cooking was done by those two. Ha! 


So the reason why you should make this dish is because its super easy and yummy. If you still want to cook but veg tonight (being the middle of a tough week) this is it! This is THE easy 25 minute dinner that will please tasted buds but won't make you stand by the stove to "babysit" it. To make this even easier serve with fresh baby carrots or a frozen veg reheated in the microwave. My kiddo had peas at lunch so he got carrots for dinner... I love peas so I am having them twice. 


Recipe is adapted from: Better Homes and Gardens 
May 2009 Magazine 
Feeds 4

2 Chicken boneless skinless breasts, cut in half (butterflied and then sliced) 
1 egg
3 Tbs buttermilk
3/4 cup panko breadcrumbs
1/2 cup finely chopped almonds
1/2 tsp salt
1/2 tsp dried parsley
1/2 tsp herbes de provence blend - just gives it a punch of flavors all at once to save time
(has thyme, marjorman, rosemary, basil, fennel, sage, lavender)
2 cups white rice ( 1/2 cup per person)
2 cups water
snip of rosemary
1 large bay leaf or 2 small ones
2 cups chicken broth 


Directions:
1. Set up a dredging station. First bowl should have the egg whisked together with the buttermilk. 2nd bowl should have the seasonings and breadcrumbs and almonds. 

2. Start cooking some rice. I used my scented rosemary rice recipe (click here for it). Once rice is half way done. Start cooking the chicken. 

3. Heat a skillet with a Tb of olive oil or canola oil

4. Slightly pound the half breasts a bit thinner so they cook evenly. 


5. Dip the breast halves on a a time into the egg mixture, then the dry mixture and then place them in the skillet. Cook them for approx 4 minutes each side. 


There. One. Easy. Meal. In less than 30 minutes... My chicken is a bit dark as you can see from the picture but it was crispy, nutty, crunchy, well-seasoned, and amazing. Perfect isn't necessary with me in my house but it has to taste good.


Enjoy! Blessings to you and your family this week! 
From my kitchen to yours


Monday, January 28

Turkish Caramelized Pear Butter Cinnamon Rolls: Treat Your Friends to an Exotic Brunch

Confession: This recipe was an accident. I had some leftover dough that I didn't know what to do with.... I could've just easily made another loaf of bread like last time. Actually my husband asked for more bread for breakfast, and was shocked that we had eaten the entire loaf a few days before. But I wanted to do something different.


Confession part 2: This was my first time making fruit butter of any kind and also caramel and I don't think I did a good job. But the mess that resulted was so good. My husband ate 3 in a row! Granted he is sort of biased in his opinion, being married to me, and welll since I do all his laundry hahaha. But eating three was a very good sign! Even the next day (this morning) I had another piece with my coffee and it was perfect.

I love that I made this cinnamon rolls with stuff I already in my fridge, like the prepared dough. It was like half of the work was already done. When talking to one of my favorite people, my sister in law, she suggested making it more dessert-like since I was sort of disappointed that the first loaf was more bread like instead of cake like, like banana bread is more cake dessert-ish.

So here is part two of your Turkish bread recipe: 

Don't forget if you did throw the extra almost lb of dough from the previous recipe into the freezer - defrost it in the fridge - not the counter!  Same instructions as before. When the dough is defrosted, you can pull it out of the fridge and start letting it come to room temperature plus some... approx 90 minutes. It seems like a long time but it was okay. I pulled it out and went to church and by the time I was back home it was ready to use. The rest of this took 5-7 minutes to throw together so it would be a perfect brunch. 


Ingredients:

1. almost one pound of leftover Turkish pear coffee bread dough
2. 2 pears, peeled and chopped
3. 1/2 Tbs apple juice
4.  1 + 1/2 tsp lemon juice
5. 1/3 cup sugar
6. 1/4 tsp nutmeg
7. 1/4 tsp cardamom (to mirror flavors in the bread)
8. a dash of salt
9. Confectioners sugar or powdered sugar (for garnish)


Directions:

1. Peel and chop the pears. 

2. Add the pears, apple juice, and lemon juice into a nonstick saucepan.  Once you get the small amount of sauce to boil turn down to low. Cover and simmer for 10-15 minutes or until the pears are soft. 


3. When the pear mixture is softened,  blend it so it looks like applesauce... thick but some liquid part... pourable. I used a food processor and it really didn't do a good job. Maybe a blender or immersion blender would've been better. Or maybe I just didn't have enough liquid. So my pear butter was on the chunky side. Not what I was hoping for but.... it tasted awesome and most of it spread easily on the loaf.  Totally going to try this again because summer is coming and pear butter on fresh biscuits sounds like an awesome way to begin a summer brunch. 

4. Add the spices to the pear mixture.

4. Now for the caramel part.... (deep breath) Hopefully you have done this before. This is the part I need to practice (hahaha).  Take the sugar to a pan and watch it slowly melt and turn amber colored. Once the color changes remove it from the heat. Stir lots!!! This is an understatement. I had crystallized bits in mine because I don't think I was stirring as often as you need to. Cooking is an adventure, right? 

6. Pour the heated sugar (should be in thick liquid form) into the pear mixture. Mine didn't sputter or splash but I have heard it might... so just be careful. Stir it together to combine. 


I was so nevous about this part. V= victory with my fingers crossed! 


7. Roll out the dough into a rectangle shape 

8. Spread the chunky or smooth (depending on how yours came out) caramelized pear butter over the top of the rectangle. 

9. Preheat the oven to 350 degrees. Evenly roll up the rectangle into a log shape and cut into even pieces. 


 10.  Bake for approx 25 minutes until golden. Sprinkle with fine powdered sugar or icing of your choice. Psst icing is super easy butter & powdered sugar... 


11. Eat with friends and family :) 


Have a great day! From my kitchen to yours

Sunday, January 27

Turkish Pear Coffee Bread (freezer friendly)

I admit I enjoy just reading a cookbook from cover to cover day dreaming about food. No I don't have a lot of extra time on my hands. Its just something I enjoy during nap times or late at night when my hubby is at work. This Turkish bread is from an excellent cookbook that I have been reading through the last couple nights. So its not all daydreaming. Some of it involves shopping and baking! Hahaha. The cookbook is called Healthy Bread in Five Minutes a Day by Jeff Hertzberg and Zoe Francois. It is awesome. I am not paid to say that. It is my own opinion. Everything in the book looks good. Granted I usually like more pictures in my cookbooks, but I wanted to make all of these breads. Unfortunately or fortunately for my waist line's sake I settled on five. 

First up to bat (trumpet sound announcing the title) is the Turkish Pear Coffee Bread. This is not a coffee cake, which I was kind of expecting. Don't worry. It is just as good. In fact, it was excellent. My family ate the entire almost lb loaf in one setting over breakfast. It was glorious. The fact that the dough was already in made and waiting to be baked the morning of, was even better. I pulled it out of the fridge, set a timer, started coffee, awhile later someplace in my second cup of coffee I preheated the oven, and threw it in..... breakfast was served 30 minutes later and my kitchen was still clean. That is a good breakfast if you ask me. 


The first thing that happens is the smell... that smell of baking bread that waves and glides through the air filling your house is welll nothing short of amazing. The smell that drives you crazy since you want to cut it and devour it as soon as it comes out of the oven. But you wait until it has time to cool. I have had so many things fall apart on me because I have had trouble waiting for amazing smelling food to cool. Then you taste it... the first taste is texture. Its moist and soft on the inside but a bit crunchy on the outside. Then you taste the spices, the warm spices of cinnamon and cardamom, that make you feel like someone is hugging you. Then you just eat until its all gone.  Try it!!!

makes 2 almost one pound each loaves
one for now
one for later  
Ingredients

  • 1/8 cup whole wheat flour
  • 3 cups all purpose flour, unbleached
  • 2 tsp ground coffee, gingerbread (I will up this next time since I couldn't taste it)
  • 1/4 tsp ground cardamom
  • 1/8 cup brown sugar
  • 3/4 Tbs yeast (this is 1/2 Tbs + 1/4 Tbs) or one packet
  • 1/2 Tbs course kosher salt
  • 1/8 cup vital wheat gluten (very easy to find at sprouts or trader joes)
  • 2 Tbs canola oil 
  • 1/2 tsp ground cinnamon
  • slightly less than 1/2 cup of water
  • 1 cup pear applesauce defrosted from the freezer  (click on it for the recipe)
  • 1 large eggs beaten
  •  1/2 tsp vanilla extract 
  • 1/8 cup plain Greek yogurt

Directions:

1. Whisk all the dry ingredients together in a large bowl. I used my new sifter and had an easy time incorporating all those wonderful spices into the flour.


2. Whisk all the wet ingredients together in a medium sized bowl. *note: I don't have a bread dough attachment for my food processor so I mixed it with a spoon and then combined it by hand. It was a piece of cake. Don't let it fool you. If you are having trouble get your hands wet. Wet hands help in the handling of this..


3. Cover in a dish - not airtight allow the dough to rest at room temperature until it rises approx 2 hours

4. Dough is now ready to use or store in the fridge or freezer in 1 pound increments. 

5. If you freeze it defrost in the refrigerator and on baking day continue on with step 7. 

6. The day you are baking it: Take half of it and shape it into a ball by stretching the sides around to the bottom of the ball. Use a little bit of flour on your work surface as needed - use a light hand. Aim for a narrow looking oval. 

7. Allow the dough to rest one more time in its new shape loosely covered on a buttered baking sheet or pan. I sprinkled a little bit of course cornmeal on my pan too to prevent sticking. If the dough is fresh you can start baking in 40 minutes. If the dough has been in the fridge or freezer please wait for 90 minutes. 


8. Preheat your oven to 350. Slash two small diagonal, parallel, cuts in the loaf using a serrated knife. The book says about 1/4 inch deep. I just guessed hahaha. 

9. Bake for 35 to 40 minutes until its richly browned and firm. The cookbook also gives specific instructions on baking on a baking stone. If you have one, you may want to read this book for yourself and gain some really incredible advice. 

10. Allow the bread to cool on a rack before slicing.... the really hard part. 

Eat and enjoy!! Save the remaining loaf of dough for the cinnamon rolls I will post tomorrow. They are amazing!  Don't miss out. 


From my kitchen to yours.... You don't need reservations for brunch. Make this bread today and serve it up tomorrow with little effort. 


Saturday, January 26

Spaghetti with Mozzerella Stuffed Meatballs


Spaghetti is a staple in my house. It was also one of the 3 things that I could safely make when I got married. At that time it was sauce out of a jar, noodles out of a box, and fake cheese over all of it. I remember those days. LOL. Almost 10 years later, its a bit more elaborate but still feeds my family. It is still that comforting meal I remember just healthier and welll fake cheese is out. Yuck.

There are a lot of ways to make meatballs and a lot of ways to make spaghetti. This is just one. It works for me. I love cutting into the huge meatballs to find melted flowing cheese inside. Its like opening a present at the table that you get to do 3 or 4 times in one sitting. Like the cheese lovers version of a lava cake. I also love that part of the sauce is homemade with a ton of healthy good for you vegetables and my favorite red wine. I don't even defrost the sauce just put it in the pan frozen. Okay that sounds lazy but I am just sayin' this is what really happens in my house.  I also have to hide the string cheese that i cut up for this dish under a towel so little fingers don't eat them before I can use them. 

This is one of my favorite Rachael Ray recipes that I have slowly adapted over the years. You can find the original here, if you are curious. I think you are going to love this! My husband raves about it every time I make it. My three year old thinks its a magic trick since he sees the cheese go into the meatball but doesn't know why or how it melts when it comes on his plate. 

Feeds 4 people 

Ingredients:
1/4 cup of panko bread crumbs
1/4 cup of milk
had to mix a bit more panko bread crumbs into this last one 
1 Tbs olive oil
1/2 tsp salt
1/4 tsp pepper
1 egg
2 (string cheese) mozzarella cheese sticks cut into 5 pieces each 
1/2 lb ground beef
14.5 oz can of fire roasted tomatoes
1 1/2 cups of smooth red pasta sauce (click on title for sauce recipe for this freezer friendly helper) 
grated parm cheese
thin whole wheat pasta noodles (approx 1/4-1/2 box) 
1 Tbs minced garlic
handful of flat leaf parsley chopped (1/8 cup)
1/2 cup of water

Directions:
1. Make the breadcrumbs. Mix the egg and milk together in a small bowl. Let the breadcrumbs join the party and just let them sink and absorb some of the liquid. 

2. In a large sauce pan, heat the oil and saute the garlic for approx 2 minutes until its golden. Add the frozen red pasta sauce and can of tomatoes. Stir and help the pasta sauce start to melt and defrost. Add the water to help thin it down. Keep over medium low heat and heat through. 

3. Start boiling a pot of water for the pasta. Salt it.  

4. Make 10 meatballs using ground beef, salt, pepper, parsley, and the egg mixture. Shape the round meatballs around the pieces of cheese. This is easy and fun. If you have a kid around let them help you. They will think its neat. 

5. In a medium skillet brown the meatballs with a couple tsp of olive oil until they are brown on all sides. Medium heat. Should take only 3 or 4 minutes. Move them around with spoon. Once browned add the meatballs into the skillet with the red sauce to finish cooking. Simmer for 20 minutes. Note: The browning part in a skillet part is optional. I have made this by putting the meatballs directly into the sauce but it just takes a bit longer, some of the meatballs tend to fall apart if you aren't careful, and you lose the texture that frying them for a just a minute will bring. Its up to you.... 


6. Cook the pasta. 

7. Serve pasta with sauce and meatballs. Top each plate with a generous handful of mozzarella and parm cheeses. 

8. Eat & Enjoy!


From my kitchen to yours


Friday, January 25

Walnut - Basil Pesto Crusted Pork Chops


Lately I have been finding fun ways to use fresh basil. A couple days ago I made some awesome mozerella stuffed meatballs in spaghetti with a generous handful of basil, and some bruschetta on the side. Yesterday I made Tomato Basil Hidden Veg soup for lunch. But so far these Walnut Basil Pesto Pork Chops are my favorite! I love pork. Yes I know its not that healthy. But bacon, pancetta, sausage, pork roasts, pork tenderloins, and well chops.... are so flavorful, and carry other flavors so well. 

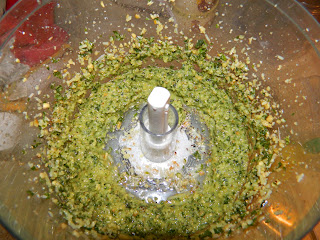
This recipe began with the idea of making a homemade pesto. Before this I had never ever made pesto before, but wasn't put off. It was exciting like an adventure. After all I never have made a nut meal out a nut dish, I didn't like. My smart alec brother would say something here like "its because you are a nut". So I went for it. Parmesan Cheese. Olive oil. Walnuts. Fresh Basil. Salt. Pepper.  Lemon juice. All the ingredients whirling around in a food processor. It was a cinch to pull together. I thought pesto was hard. ummmm... no. You can totally do this too. 


uncooked 
This dish is easy to pull together it just takes some prep and time. Make the pesto a few hrs ahead of time and cover the pork with it. Then bake it off in the oven. Make some yummy sides for it and eat. I served mine with wild rice (made with chicken broth for more flavor) and broccoli. The pesto was so good with the pork I wanted to lick my plate off the last time I made this. Try it. Its totally guest worthy but easy enough to do on a weeknight. 


cooked: look at that beautiful golden crust!


Ingredients:

1. 2 small handfuls Fresh basil (approx 3/4 cup)
2. 1/4 cup good Parmesan cheese (off the cheese isle)
3. 1/2 cup walnuts (whole or pieces whatever you have or can get on sale)
4. approx 1/2-1 cup olive oil, for drizzling in enough to make it look like a thick paste, I was just pouring - not really measuring this part
5. 1/2 tsp lemon juice, 
6. 1/2 tsp salt 
7. 1/4 tsp pepper
8. 3 pork boneless thick cut pieces (mine were an inch and half thick maybe)
(although this makes enough pesto to cover 5 pieces if you are cooking for a larger family)
9. Thermometer (you don't want to over cook your pork) 

Directions:

1. Mix the pesto up in a food processor until smooth

2. Top the pork pieces with the green thick spread

3. Let the pesto start to soak into the meat for at least half hr in the fridge. 

4. Bake the pesto crusted pork chops in the oven for 45 minutes at 350. At the 45 minute mark check the temperature. I always cook mine until its past the pink just a tiny bit. My husband freaks out if there is pink at all. But pork goes from pink to a dried out piece of meat super fast. I aimed for a temp of 160 (which is normally medium). 

5. Broil on high (for 2 minutes to get the top golden brown to give it color, texture, and a bit of crunch. If you do like your meat a bit more pink, once the temp inside is 150 degrees go ahead and broil since it will continoue cooking a bit even a few minutes after you pull it out of the oven. For safety you should make sure the meat is 160 degrees after broiling. 

6. Let the meat rest a few minutes and so you don't burn your fingers

7. Serve and eat with the sides of your choice. 


As with many things in life... 
this incredible meal is worth waiting for.  This is not a 30 minute meal. This is not a crock pot meal or make ahead although you certainly could make the pesto a day ahead. Enjoy and take a moment to savor life! 

Have fun creating a great meal! From my kichen to yours. 


Thursday, January 24

Tomato Basil Hidden Veg Soup

So it was wet this morning. It was sprinkling before lunch but not too hard so I decided on walking to the bank instead of driving there. Its a jaunt, I am not going to pretend its a small walk across the street, but there are lots of trees, flowers, birds, and today puddles. By doing the 2 mile round trip with my son who had a blast with the puddles at least, it saved me some time by not needing to hit the gym. I would rather be outside anyways. It was beautiful. There were gray clouds everywhere. The ground was wet, and I am assuming it had gotten windy because the areas around the trees were solid green colored. I wish I had my phone or camera to take a picture of it. It was as if we were walking on a soft green rug. I hadn't ever seen that before. My son had found a stick along the way and had fun scraping the ground noisily and then finding puddles to "clean it off" with. In the end it was nice to get back home because it was chilly.... and chilly in my house at least... means soup. 


Wahoo. Soup. Okay Yes I get excited about soup. Its a problem. I can look for a 12 step program later. First let me tell you about this spicy yummy red soup that I had so much dunking my grilled cheese sandwich into. Yeah okay so I looked like a kid... first puddles and now dunkin' sandwiches... welll at least it was a grown up sandwich and soup. I couldn't believe how creamy and diverse the soup was - or how well my hidden veggies stayed hidden so the basil and tomato combo could shine in the spotlight. Creamy. Spicy. Flavorful. Hot. Cheesy.... Perfect way to end a rainy afternoon.  


My soup inspiration came from: here. I would've never thought to use greek yogurt in a soup had I not read her blog. Brilliant! If you are curious about what the hidden vegetables are click on my red sauce link below. You might be surprised. If I hadn't cooked it myself I wouldn't have thought all those veggies were in the soup. 

Ingredients

1 - 14.5 oz can of roasted tomatoes
1/2 yellow onion chopped
2 tsp minced garlic
1 tsp olive oil
1 cup chicken broth, organic
1/2 cup plain Greek yogurt
1/2 cup shredded cheddar cheese
1/4 cup fresh basil, chopped
1 tsp dried oregano
1/2 tsp sugar
1/2 tsp salt
1/4 tsp pepper
1/8 tsp red pepper flakes

Directions:

1. Over medium low heat cook the onion in the olive oil in a small pot for approx 5 minutes until onion is tender 

2. Add in the garlic and stir - just until its golden - 2 minutes 

3. Add in everything else except the diary (cheese & yogurt). I added the frozen sauce directly into pot with the spices and canned tomatoes. By breaking up the big pieces with a spoon, and stirring the liquids over low heat, it was soon was incorporated. You couldn't tell I had used anything frozen. 

4. Put lid on pot, and simmer for 10 minutes. 

5. Smooth out the soup using a blender, food processor or immersion blender. Be careful. Use a towel to secure the blender or food processor lid before blending. 

6. Add the soup back to the pot and stir in the cheese and Greek yogurt on low heat, until combined. 

7. Serve hot with crackers, grilled cheese, or your favorite crusty bread for lunch, brunch or dinner. This would be great easy meatless dinner. Try not to eat it all yourself...


Thanks for sharing my rainy day (sort of) adventures and soup with me. As always... Enjoy yourself and your food. 
From my kitchen to yours!