Thursday, October 31

Pepper Turkey, Bacon Apple, Grilled Cheese Sandwiches: Fall in a Sandwich


It would be safe to say that my favorite sandwiches are always the ones with either bacon or cheese or both. So when I came across this sandwich with both bacon, cheese with a green crisp apple I knew I wanted it. To me apples are one of signs that fall has arrived. Apple pie = fall, apple desserts = fall, apple picking = fall. It makes sense to me.

Now there is a whole food idea with combining cheese + apples together. This is not a new trend. Some people will go as far as adding cheddar to their apple pie. This baffles me even growing up in the state that's known for apples. Yet after tasting fresh apple in this oozy, gooey cheesy sandwich I think I have a glimmer of what they are talking about.

Does apples really go in a sandwich though? I would yes but not without reservations. For example when my son bit into his lovely sandwich, even though the apple was thinly sliced, the entire apple slice fell out. Things had trouble staying within the bread. The fall flavors tasted so good together so I wouldn't delete the apple despite the logistics of eating falling food. Next time I will try grating the apple onto the sandwich, so every bite can have a bit of apple.  Second the massive ingredient list.... turkey, cheese, apple, bacon - that's a lot of ingredients. Won't it fall apart. Nope. I used a very steady strong sourdough bread. By grilling it or making a grilled cheese the bread toasted and was very useful in holding it together.

There are so many apples but I think granny smith is the right one for this job because effectively breaks up the richness of the bacon and cheese with it's tart fresh taste. Even if you don't like sour things this will be perfectly refreshing. To offset any overwhelming sourness I slipped in a few sweet slices of pear. If you didn't know it was in there you would think it was just another part of the apple. It just adds another depth of flavor.

Trade in the classic grilled cheese for this little fall cousin for lunch or dinner. For my family this was a very nice easy filling dinner served up with some salad, chips, and the remaining pear and apple slices. The original recipe, from a Martha Stewart Living Magazine (Jan 2013) still sounds good. I might have to try it. Or just make another one my way with the peppery turkey, sour apple, bit of sweet pear melted cheese cooked in the bacon drippings as it might be better.


To make two Sandwiches you'll need: 

2- 4 pieces of sourdough bread (depending on the size of loaf)
4 slices of deli pepper turkey
3 slices of pepper bacon
1 green granny smith apple, cut into very thin slices
1 pear (not a typo) cut into very thin slices
4 slices of cheddar, mild (sharp would taste good too), cut into halves


1. Fry up 4 strips of bacon in a large skillet, saving the drippings

2. Once the bacon is cooked to a crisp, pat the bacon down with a paper towel. Remove about half of the drippings form the skillet and turn the heat to low. 

3. Build your sandwiches in this order: bread, half slice of cheese, 1 1/2 slices of bacon, half slice of cheese, 2 slices of pepper turkey, half of slice of cheese, 3 thin slices of pear, 3 thin slices of apple, half of slice of cheese. By cutting the cheese pieces into halves I found that despite the many ingredients when they melted it was easier for the sandwich to hold the layers together than if the cheese was in larger pieces confined to the outer edges of the sandwiches.

4. Put your fall time sandwiches in the same skillet or on a grill the bacon was cooked in.... cook them until the outside is golden brown and the cheese is melted. Approx 5-10 minutes depending the temperature. To insure my grilled cheese melted all the way through I cooked mine with a heavy salad plate and a can of fruit pressing down on the top, flattening the sandwich like an sandwich/panini press.

Serve with salad, fruit, or chips for an easy lunch or dinner


Enjoy fall!
From my kitchen to yours

Sunday, October 27

Bacon Zucchini Chili & Book Review


Bacon is dynamic. It can turn any mundane entree into something spectacular and memorable. Bacon is a popular thing to find on pintrest, and on most blogs including mine. Recently, I read a library book titled Bacon: A love Story by Heather Lauer, . I wanted to share the book with you because it made an impact on me. It's always fun to find a cookbook. But it's a surprise to find a cookbook and good recipes within a book. This is one of those. You can acquire it easily on amazon if you search the author's name. Please note I have never met, nor heard of the author before, and am not receiving anything for reviewing this book. I just love eating bacon, and the book looked interesting. 

Book review: I give it a "B-". It is an easy read, high school reading level, easy font, with minimal illustrations. Lauer's book is 100+ pages, and took me about a week to finish reading at a moderate speed. The pace and feel of the book is slow, perhaps due to the disorganized feel of the chapters, and repetition of similar information. I didn't feel compelled like some novels to not move until it was finished. But neither did I stop reading because I liked the fun facts, and the historical anecdotes that made me laugh. It was a relaxing read, something that didn't require my intent 110% concentration. We all need mini literary vacations. Lauer's book goes into deep insightful descriptions of the pork smoking process with real quotes from smaller family owned operations, and obtains bacon recipes from real hotels, shops, and restaurants from all over the country! Most of the recipes scattered throughout the book looked great, although about 50% seemed inapplicable to me, because of the lack of family friendly-ness. Many recipes seemed a bit too elevated or elegant for my little family and country cooking. I strive for good family recipes in real life and my blog. If you are curious about bacon at all, you should read this! But warning - you may find yourself buying more bacon the next time you go shopping as a result. After reading it I bought peppered bacon for the first time ever. Peppered bacon is so good, I had no idea, and I have this fun book to thank! 

As with most bacon lovers, I don't think bacon can be overdone. My best experiences to date with bacon have been bacon cinnamon rolls with maple frosting from Dorothy at Crazy for Crust, an epic egg topped, maple syrup candied bacon cheeseburger, homemade bacon mayo, and now this super yummy, flavorful, and non spicy bacon zucchini chili. I feel bad for always making my chili rather heated so I really made sure this one was toned down. Turns out that because I toned down the heat, the flavors really came out swinging. This new recipe is now tied with my other favorite chili, the yummy apple chipotle one I did last fall. Chili is such good, fall, cold weather, football food. I need to make that again :) 


Here's what you need to make my Bacon Zucchini Chili 
(inspired by Lauer's book)
serves 6-10 depending on portion sizes
 freezes beautifully
cook + prep = 30-45 minutes


Ingredients:
3 1/2 cups low sodium beef broth
1/2 Tbs chili powder
3 cloves of garlic, minced
1 medium white onions, finely diced
2 cans of organic black beans (15oz each)
2 medium zucchinis diced to size of your personal preference or shredded (mine measured out to be 2 cups worth)
1/4 tsp smoked paprika
1/4 tsp ground cinnamon
5 pieces of pepper bacon (little less than half a package)
1/2 lb of ground beef
2 dried bay leaves
2 cans of fire roasted tomatoes (15oz or approx)
1/2 Tbs Mexican dried oregano
1 orange, scrubbed, and cut in half (adds special touch)
2 cups red veggie sauce (click on title for recipe)
1 Tbs kosher salt
1 1/2 Tbs ground cumin

5 Easy Directions:

Step 1: In a very large pot cook the bacon. Drain half of the fat out. 

Step 2: To the pot add the garlic and onion and saute them in the remaining bacon fat. 


Step 3: When the onions are translucent, add in everything else except the beans. Simmer covered for 30 minutes covered over medium low. I added my red pasta veggie sauce straight from the freezer & freezer bag since there is enough liquid in the recipe help it defrost quickly in the large pot. 

Step 4: Drain the beans and rinse extra salt off. Add them to the pot. Remove the bay leaves and the orange halves. 

Step 5: Taste and adjust seasonings as needed. Serve once the beans are hot. 

Good sides: crackers, corn bread, corn on the cob

Fun chili toppings: oyster crackers, fresh green onion, green peppers, green chilies, diced jalapenos, sour cream, fresh tomatoes, shredded cheddar or pepper jack cheese for a kick


I apologize I don't have more than 1 picture for this recipe. It was so easy and most of it was just dumped into 1 pot thus multiple pictures seemed redundant. 
Hope you enjoy this easy fall/football meal! 
from my kitchen to yours

Thursday, October 24

Cardamom Zucchini Cinnamon Rolls with Maple Frosting (updated freezer instructions Nov 11,13)


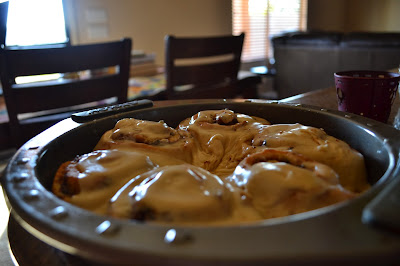
I have been on a zucchini kick for a little while. So... before I dive into the second half of my Rachael Ray list I wanted to share with you an awesome gooey & delicious zucchini cinnamon roll recipe. This mouthwatering recipe is amazing! You can make it the night before, throw it in the fridge, and bake it the next morning. There is no reason to get up at 5 am to get these done in time. Or you can make it on the sunday night (thinking that you are being clever), forget to bake them on Monday, run out of time on Tuesday, and they will turn out great on Wednesday. Truth: in my crazy household these beauties hung out in the fridge for 2 days. If you want to plan ahead on purpose you can freeze a batch for up to a month - probably longer - I just haven't tried longer than a month. Anyone who has cinnamon rolls in their freezer for longer than a month has more will power than I do! The texture of the dough is fluffy, moist, tender, and incredible. Pair it with some sweet maple frosting and your morning and coffee - its like christmas in your kitchen. 

I was so relieved when the cinnamon rolls from the freezer rose and baked properly because that means no more huge pans of cinnamon rolls around my house. I can make batches of my favorite rolls, and freeze the extras. I have made this recipe 4 times since I found it earlier this year. Happily, the whole wheat flour and extra zucchini makes it a bit healthier. I hope you enjoy this recipe as much as I do! 


This picture is a half of a batch. So good!!!

Cardamom Zucchini Cinnamon Rolls 
with Maple Frosting

makes 12 in the whole batch - easily halved or doubled

recipe adapted from creative blogger crazy for crust
You should absolutely make her bacon cinnamon rolls!


Ingredients for the dough:
2 1/4 tsp active dry yeast (one packet)
3/4 cup of warm non-fat milk 
1/3 cup of white sugar
3 Tbs butter, unsalted, softened
1/2 tsp salt, 
1 egg
1 1/2 cups of all purpose flour
1 1/2 cups of whole wheat white flour
1/2 tsp ground cardamom

Ingredients for filling: 
1/2 cup of butter, unsalted, softened
3/4 cup of brown sugar
2 cups of shredded zucchini, water squeezed out
2 Tbs whole wheat white flour
2 Tbs cinnamon
1/4 tsp ground cardamom

Ingredients for the frosting:
1-2 Tbs nonfat milk (or whatever kind you have)
6 Tbs butter, unsalted, softened
2 cups powdered sugar
1/4 tsp maple extract (light hand = super strong)
2 Tbs pure maple syrup
1 tsp vanilla extract


Directions for the dough:
1. Heat the milk in a cup in the microwave for approx. 25-45 seconds aim for 120 degrees.

2. Add the yeast to the cup and stir. Let it sit and for about 5 minutes to get cloudy and foamy (activating the yeast). 

3. In a mixer bowl or large mixing bowl cream together the sugar butter, salt and egg. It may be slightly chunky thats okay.

4. Pour the yeast mixture into the butter mixture. Stir or mix on low for about a minute. 

5. Add the flour and ground cardamom slowly over low or medium mixing speed. If you are using a stand mixer use the paddle attachment until the dough starts to stick to the paddle then switch to the dough hook. Using a dough hook over low speed continue mixing until the dough forms a ball in the middle of the bowl. 

6. While the mixer is mixing spray a large bowl with nonstick cooking spray. Put the dough ball into the bowl and cover the bowl with plastic wrap. Let it sit for 1-2 hrs while it rises. It should double in size. 

Making the cinnamon rolls:
1. Shred your zucchini and wring it out with a towel or strong paper towels over the sink. Its amazing how much liquid this veggie has! Note (from experience) if you use a towel the liquid that comes out is green and it may turn your towel green - don't use a white one. 

2. In a bowl combine the filling ingredients the zucchini, brown sugar, butter, flour, cardamom, and cinnamon. Stir until it forms a paste. 

3. Once the dough has risen, sprinkle some flour onto your work area or counter. Roll the dough out to a large rectangle. 

4. Spread the filling out evenly over the entire surface. 

5. Roll up the dough into a log as tight as you can. 

6. Slice it in half and with each half make 6 cinnamon rolls for a total of 12. 

7. Spray a cooking pan with nonstick spray and place them side by side giving them a little room because they will rise considerably. I use two round cake pans for this. Wrap the tops with plastic wrap. 

8. If you are baking them immediately let them rise on the counter for a second time for 30 minutes - 1 hr. They should be large and fluffy. Note: They will not get much bigger than they are when you put them in - so while I write 30 minutes in the directions I recommend 45 if they are looking small or your kitchen is cold. 

9. Bake at 350 for 20 minutes or until golden brown. 

10. Whip up the frosting. Combine all the frosting ingredients in a mixer and mix away. Add more milk if needed. The texture should be creamy but not runny. If it seems stiff and hard to spread then add 1-2 Tbs additional milk. 

11. Spread the frosting over the cinnamon rolls the moment they come out of the oven. Let it melt and get in all the cracks and get super gooey. 

12. Enjoy warm with your fav people and coffee (of course)


How to do the make ahead part:
Follow up to step 8. Complete step 7, and put them in the fridge until the morning you are going to bake them. If you are putting them in the freezer I highly recommend double wrapping them with plastic and then with foil just to be sure. Use a post it note or a piece of paper with a marker to label them with the cooking time and temp for easy baking later.

Baking frozen cinnamon rolls
Pull them out of the freezer and let them fully defrost in the fridge overnight. The morning you want to bake them, grab a baking dish, and fill it with water. Put the cold pan of water in the oven on the same level as the cold pan of cinnamon rolls you have in the fridge. Let the rolls rise in the oven at 170 degrees for 20 minutes. Check on them. When they are big and fluffy start baking. Increase the oven temperature, you don't have to take the rolls out of the oven, and bake for 18-20 minutes until they are golden. While they bake make the frosting - super easy 3 minutes :)


I love this maple frosting! 


from my kitchen to yours 

Tuesday, October 22

Chocolate Pumpkin Chocolate Chip Cookies


Rich decadent fall cookies that are easy to whip up should be apart of everyone's October. I have a healthy pumpkin recipe on my blog already so I figured I should do something not healthy. Is there a word for that? Oh yeah chocolate. Thankfully pintrest was there to bail me out. I found this excellent recipe there, and changed a few things to emphasize that "pumpkin fall" taste, be a little tiny bit healthier by eliminating half of the oil, and to be sweet & chocolaty. 

Last night we had a few friends over to bbq burgers and watch half of Monday night football together. Sounded like the perfect time for cookies too. My son was so excited to help. Its fun making special food for friends. Heck its fun making special food for football. This is a equal opportunity kitchen serving chocolate on any holiday, event, or emotional whims. (And just incase I really sucked in fantasy football I could have a cookie to help me get over the pain). 

I heart Monday night football. Monday is different because we get to watch as a family (unlike Thursday). After my hubby's been in class gone most of the day its a less likely we'll argue because we miss each other. Truth. I love being married. He loves being married. Life, its just tough sometimes. We are going through stressful stuff just like everyone else. Things like work, medical stuff, college, trying to raise a kid up caring for others and not about material acquisitions and following the Bible, learning (with lots of errors) how to be honest, consistent, humble, loving to family members = all this life stuff requires good chocolate chip cookies. 


Chocolate Pumpkin Chocolate Chip Cookies
Chocolaty fudge-like goodness. It is your next pumpkin treat. It is not one of those recipes that you add some token pumpkin flavor to, or a tsp of pumpkin puree because of the season or month. Pumpkin really is the star of the show in this cookie :)


Ingredients:
1 cup of brown sugar
1/4 cup of vegetable oil
1/4 cup of unsweetened cinnamon applesauce (used homemade)
1 cup of pumpkin puree
1 egg
1 Tbs vanilla extract
2 cups of whole wheat white flour
1/2 cup of cocoa powder
2 tsp baking powder
1 tsp baking soda
2 tsp ground cinnamon
1/4 tsp of allspice
1/4 tsp of cloves
1/2 tsp salt
1 cup of chocolate chips
half a bag of mms - I looked for the new pumpkin spice ones but ended up with dark chocolate


Directions:
Step 1: In a large mixing bowl or a bowl of a mixer cream the brown sugar, veg oil, and applesauce together until homogenous. 

Step 2: Add the pumpkin, egg, vanilla and cream it again. 

Step 3: Sift together the rest of the ingredients except 
chocolate chips and mms. 

Turns out having a dinosaur on the counter  really helps the baking process . 

Step 4: Add the sifted ingredients to the mixing bowl.  Stir slowly until combined. Will be very thick. 

Step 4: Stir the chocolate chips in by hand. Start preheating your oven to 350 degrees.

Step 5: Using a spoon because this dough isn't exactly the hand rolling type form somewhat of a circle shape and drop them on a nonstick and sprayed with nonstick (just incase). Pat them down to flatten them just a little bit. They don't spread out and its easier to fit more mms on the top of something flat. 

Step 6: Press 4-6 mms into each cookie top. 

Step 7: Bake for 8-10 minutes. Cool on the cookie sheet for 4-5 minutes (as they will continue cooking there) then remove for consumption or letting them rest on a cooling rack.  


Enjoy! 
From my kitchen to yours

Saturday, October 19

Spicy Pumpkin Mac & Cheese


I am back from my little break. Feeling much better. Thanks. I wanted to share this before I jumped back into my challenge of 30 Rachael Ray recipes. This recipe is from one of my favorite bloggers, Lindsay. She posted this yummy pasta mac and cheese recipe and her pictures immediately made me hungry. But as I was making it I was like you know this would taste better if it had a zing or punch to it. I blame it on football season - all those chip and salsa first downs... lol. So i upped the ante a little bit by giving it some heat and adding all my favorite things more cheese, more fat, and more veggies. What recipe doesn't need a touch more bacon? Love that stuff. Its also safe to say I have a good working relationship with cheese.  So here goes it. Happy Pumpkin eating!

 The recipe 
Serves 4 comfortably
prep + cook time = 20-25 minutes 
(including time for bacon to cook & water to start boiling)

2 cups of veggie pasta rotini 
3 large carrots, peeled if you want, or just washed well and finely diced ( 1 1/2 cups)
1/2 cup of pumpkin puree
1 clove of garlic, minced
1/4 cup or 6 green onions, sliced
1/4 cup (6 pieces) of cooked crisp crumbled bacon 
2 oz cream cheese (not fat free)
1/2 tsp salt + 1 tsp for the pasta
1/4 tsp pepper
1/4 cup of evaporated milk, fat free
1/4 - 1/2 cup of pepperjack cheese *


Step 1: Cook pasta as per directions on the box with 1 tsp salt. Half way through cooking time add in the chopped carrots (no more than 5 minutes so they stay tender crisp)

Step 2: Drain pasta the return it to the same pot on the stove over low. Add in all the rest of the ingredients except green onions. 

Step 3: Stir the pot until all the cheese is melted and it looks like mac and cheese. Taste add additional salt or/and pepper if needed. 


*Note: I have an approximate amount of pepperjack cheese listed because this brand was spicier than most and I didn't put it in my son's mac & cheese. So I scooped his bowl up and then left the pot on low while i let the rest of the cheese melt into the remaining pasta for everyone else. I am telling you this because I do look for family friendly - kid friendly recipes and want to be real on how things really work in my kitchen. 


Step 4: Sprinkle each bowl you serve up with green onions for texture, color and freshness :)

the kid's bowl - hes not super fond the purple color but it looks good in this picture with the orange veg.

Enjoy!  We really liked this meal and I enjoyed how easy it was to incorporate veggies into homemade mac & cheese (a staple at my house) Next time I might cut half of the carrots out and put in some frozen peas. I really like the whole green orange october color themed bowl I stumbled onto :) 

Sunday, October 13

Challenge 30 New Recipes in 30 days: Half Way Mark!

So this entry isn't about a recipe. But I think its a valid entry if you have been following my blog and know of my cooking/blogging goals. Have you ever been excited about a personal goal and worked hard to race towards it? How about when you set a goal and you are mid-way into it and all of sudden it started to feel like work? Did you make your goal or was it just out of reach? There's something definitive and measurable about making a goal. I guess it makes me feel good as a person. Our society promotes productivity as a whole. It becomes attached to self-worth of a person or entire people groups in some cases - but that's a separate issue. 

Recently, last month I posted a goal I wanted to achieve - cooking 30 new Rachael Ray recipes in 30 days. The goal was to cook and blog more constantly - everyday for a month. Turns out its a bit harder than I thought it would be - especially after a couple recipes just flopping. I do like challenges though and the first half is officially done! 


First Half Recipe List(plus one)

1. Avocado Tuna Bacon Salad (with homemade bacon mayo)
2. Rachael Ray's Spanish-Style Enchiladas
3. Rosemary Leek & Yellow Squash Soup
4. Pumpkin Spinach Quesadillas
5. Easy Braised Veggies in a Cream sauce
6. Crunchy Tarragon Chicken: Winner Winner Chicken Dinner
7. Beef & Spicy Chorizo Zucchini Chili
8. Turkey Curry & Cucumber Relish
9. Garlic Flatbread (eat with the ground turkey curry dish)
10. Sausage & Pepper Bacon Breakfast Muffins
11. Homemade Creamed Corn - Easy Side Dish
12. Peppered Candied Bacon & Egg Burgers on Ciabatta Bread
13. Grilled Chicken Broccoli Bowls (Take Out Fake Out)
14. Whole Wheat 3 Cheese, Kale & Sausage French Bread Pizza
15. Kale & Sausage Pasta
16.Spicy Zucchini Chicken Enchiladas w/ Creamy Tomatillo Sauce

My personal top favorites dinners of this list were the kale & sausage pasta, tarragon chicken, the spicy enchiladas (perfect heat level & make-ahead meal), and the bacon egg burgers. What a great two weeks of eating! Favorite side dishes were the garlic flatbread - I think I could eat that with anything, and the braised veggies. Yum! 

Please note I will be back in about a week to finish the second half of my Rachael Ray recipe list. I will be out of the kitchen this week recovering & taking it easy from a little outpatient thing I had yesterday. Have a great week!

Keep cooking :) 
from my computer to yours

Friday, October 11

Spicy Zucchini and Chicken Enchiladas with Creamy Tomatillo Sauce


I have been on a zucchini kick lately. Its been fun. What a great way to use up that end of summer produce than to put it in cookies, soups, stews, add it to pasta, ect. I must admit I had never put zucchini into enchiladas until now. The result was something easy, quick, freezable, super spicy, and best of all super yummy! The original recipe didn't have chicken or zucchini but thats okay. We are meat eaters in my family. I think if would've made the rice and bean enchilada recipe as written I might've been asked to order a pizza after "dinner" was done. We don't do the whole meatless monday trend. I would rather eat lots of meat and stay away from the processed foods. Thats a whole different trend with our culture we should talk about another time.....until then you definitely should try this lovely adaptation from Rachael Ray's Everyday magazine October 2012 issue


serves 6-7 (2-3 each)

Ingredient list: 
1 heaping cup or 4 oz shredded/grated pepperjack cheese
1 heaping cup or 4 oz shredded/grated montrey jack cheese
1 whole jar of medium thick and chunky salsa verde
1 yellow squash, finely diced
1 zucchini, finely diced
1/2 tsp salt + 1/2 tsp salt
1/4 tsp cracked peppercorns
1/2 cup of white rice 
1 bay leaf
1/2 tsp taco seasoning (homemade or store bought)
2 scallions or green onions, thinly sliced
4 oz cream cheese cut into chunks
12-15 small corn tortillas
1/4 cup or 1 large handful chopped cilantro plus another handful for garnishing (optional)
2/3 cup half and half
3 chicken breast halves (previously cooked) leftover chicken from another meal would be great, finely dice it up

Directions:
Step 1: Cook the rice. In a small pot put 1/2 tsp of salt, the bay leaf, taco seasoning, the rice, and 1 cup of water together. Bring the water to a boil. Reduce the heat and cover for approx. 12-15 minutes. Fluff with a fork when you are done and transfer it to a bowl to start cooling down. 

Step 2: Make the sauce. In a blender or food processor combine: the salsa verde, half and half, and cilantro. Should be a creamy thick liquid. 

Step 3: Sauté the veg. In a small saucepan or skillet sauté the veggies for 3-5 minutes on medium or medium low with salt and pepper until they are tender crisp with butter or olive oil your choice. You don't want them browning just softening.


Step 4: Assembling. Combine the cooled rice with half of the jack cheeses, the green onions, diced cooked chicken, sautéed veggies, and cream cheese. Take 1/4-1/3 cup portions and put them in the center of each tortilla and roll them up. Place the filled tortillas side by side in two prepared baking dishes. When all the tortillas are filled, or you ran out of room in your pans, or ran out filling (all common issues with making enchiladas or burritos) top each baking dish with the lovely creamy sauce. Cover the sauce in both pans with the remaining cheese. 

Step 5: Bake at 350 for 20 minutes until bubbly and delicious 


Step 6: Serve with sour cream, tortilla chips, and additional cilantro 

Enjoy zucchini & other end of summer/fall favorite flavors
from my kitchen to yours

Thursday, October 10

Kale & Sausage Pasta


Pasta used to be my favorite food. I would make it 4 or 6 times a week. I still love it, but my approach to food has changed. I can't eat like that anymore - Anyone else know I am talking about here? So now I make it like twice a month. So you can imagine when I make it, its going to be awesome. I am not going to waste my pasta cravings on a box of mac & cheese from the store that tastes like cardboard. There are only a handful of recipes I will make. This recipe, number 14, in my personal goal of making 30 new Rachael Ray recipes in 30 days, is amazing and will join the list with my other favorites!! This was adapted from an October 2012 issue of Everyday, and I may be biased by I think I did a better job with it. 

The tender crisp veggies, melted cheese, caramelized bits of sausage, and the cream sauce just hugging the pasta is simple and memorable. Not bad for a 15-16 minute recipe from start to finish - that includes waiting for water to boil. I lightened it up from the original ditching the heavy cream, and added more veggies so go ahead and make it, feel good about your food and your body. We all need good food to fuel us, to get stuff done, to maintain life and mental stability, and to have good attitudes. Be balanced and try some yummy pasta and veggies on a crisp fall day :)


Kale & Zucchini Sausage Pasta
serving size is 3
prep + cooking time: approx. 15 minutes

Ingredients:
1/2 lb fettuccine noodles
1 shallot, finely chopped
1 clove of garlic, finely chopped
4 oz (half of a small block) of mozzarella cheese
2 zucchini's quartered and finely diced into diamond shapes
1/2 bunch of kale approx. 4-5 leaves, stems removed 
1/2 cup of half and half
1/2 lb of mild ground sausage
1 tsp flour
salt & pepper to taste
fresh basil (optional)

Directions: 
Step 1: Bring a large pot of water to boil and add 1-2 Tbs salt

Step 2: In a large skillet start browning the sausage over medium heat. I didn't need to add oil since I was using my cast iron pan but if you need to help it olive oil would be a good touch. When it looks about half way done, add in the zucchini, garlic, and shallot. 

Step 3: Once water is boiling cook the pasta as per directions on your box. Once pasta is done, drain it, and return it back to the pot. Keep 1/2 cup of the starchy cooking water.

Step 4:  Sprinkle the flour over the sautéed veggies, and let it cook for about 1 minute or so stirring. Then add in the starchy cooking water and the half and half. Bring to a simmer and let the liquids reduce by half (takes less than a minute). 

Step 5: Add the kale to the skillet with the sautéed veggies. Remove the pan from the heat. Mine looked like the kale wasn't going to fit in the pan but it only took about 30 seconds to wilt. The dish is now ready to combine. 


Step 6: Toss/Pour the sauced veggies into the pot with the pasta and marry the flavors together.

Step 7: Grate or Shred the cheese over each bowl and top with fresh basil (optional)


What a fun way to eat kale & zucchini :) 
From my kitchen to yours


Wednesday, October 9

Whole Wheat Three Cheese Kale & Sausage French Bread Pizza


We have been doing pizza pretty regularly since football started 4 1/2 weeks or so ago. I am hanging in my fantasy football league but beginning to HATE my defensive line/special team. Never EVER picking the Giants again. Sigh. okay. food. Pizza. Please ignore that. It was a tough weekend for me.  

If you, like me have never had kale on pizza before you might be pleasantly surprised. Honestly, my husband tolerated it, but my son and I ate it just fine. Actually, I thought it was amazing. But I eat green veggies all the time so warning to those this may be an acquired taste. Heck though if I could get my family to eat one of these pizzas twice a football season I think I would be feeling really good as a mom. 

This is one of the really approachable recipes because it starts with a store item = french bread. With the three melted cheeses, and crumbled sausage bits, and crunchy bread it might become one of your favorite pizzas too.  Dinner done in 20 minutes isn't a bad way to go either. Recipe was adapted from September 2012 Everyday Rachael Ray magazine. I used a different set of cheeses and made it a bit more family friendly. This is recipe number 13 of my challenge to make 30 Rachael Ray recipes. 


Ingredient list:
1 loaf of whole wheat french bread
1 lb of lean pork sausage
1/2 cup of red sauce (or your favorite pizza sauce)
1 oz thinly sliced or grated parm (about 1 handful)
2 oz of smoked Gouda cheese thinly sliced (about 8 thin slices)
1 cup of shredded mozzarella cheese
4 large kale leaves (stems removed)
2 Tbs chopped fresh thyme
salt & pepper (see below for amounts)
1/2-1 tsp oil 

Step 1:  In a large pot bring water and the kale to a boil. You want the water to be barely touching the kale about half way. Add 1/2 tsp salt. Cook it for 2 minutes on medium with a steady simmer of bubbles. 

Step 2: While kale is cooking. Grab a bowl and fill it with ice and water. You are going to immediately transfer the cooked kale to the bowl with a slotted spoon to stop the cooking process. Blot it with some paper towels or wring it out in paper towels to remove excess water. Set it aside.


Step 3: Preheat your oven to 400. 

Step 4: Cook your sausage with 1/2-1 tsp of oil and 1/2 tsp salt and 1/4 tsp pepper. Should take about 5-6 minutes using a spoon or spatula to crumble it into small pieces. Have a paper towel lined plate to transfer it to, to cool slightly before adding it to the top of the pizza. 


Step 5:  Cut your loaf of bread open and place on a baking sheet. Start layering your ingredients on both sides. Spread the pizza sauce. Sprinkle the grated or sliced parm. Layer the sliced Gouda next approx 4 pieces per loaf. Layer the kale next slightly pulling it apart into pieces for easier eating. When the sausage is done, add that to the top of the kale. The mozzarella cheese & thyme is last but not least. The fresh thyme really is a fall smell for me and brings everything together. 

Step 6. Bake for about 10 minutes until it is golden, bubbly, and delicious looking.  Let it cool slightly before serving. 


Enjoy football and fall :) 
Happy pizza/veggie eating 
from my kitchen to yours

Monday, October 7

Grilled Chicken Broccoli Bowls (Take Out Fake Out)

Happy Monday to you. So do you have a favorite take out dish? I must admit when thinking about take out I think about stuff I never let myself eat like orange chicken or beef & broccoli. That stuff tastes so good but my stomach just doesn't like me afterwards so its probably been 2-3 years since I have had it. That doesn't mean I don't crave it though.... So in response to my craving I made this. Being fall in southern Arizona it is the perfect time to grill indoors or out so I modified the recipe to reflect that, and added my own touches like extra onion, sesame seeds, chicken breast instead of chicken thighs, raw almonds, less amount of oil, ect.... 


It is an easy 30 minute meal (some of it can be made in advance if you chose to save some time). My family tried it yesterday and liked how it tasted like good take out minus the grease and delivery charge. Nothin' spectacular but it was relaxing to just hand everyone a bowl they could comfortably eat and watch the football game(s). Family approved. Kiddo friendly (thanks to the sugar I am sure wink wink). In my challenge to do 30 new Rachael Ray recipes in 30 days this is recipe number 12 taken from February 2010 magazine issue. It is easy, pretty fast to throw together, and uses fresh healthy ingredients. 

Note: I would've used brown rice but only had white. Feel free to use whatever you have in your pantry.


Grilled Chicken Bowls
Serves 4 
cook + prep time: approx 30 minutes


Ingredient list:
1 1/2 cups of rice, brown or white
3 cups of chicken stock (I used homemade)
4 chicken breasts halves, pounded slightly thin
1 bunch of broccoli (approx 1 1/2 cups), chopped
2 green onions, thinly diced
1/2 white onion, finely diced (2 stalks of celery or 1 leek would be a good sub or addition)
1 cup almonds, raw, roughly chopped
1/2 Tbs worcestershire sauce
1/2 Tbs mirin
1/4 tsp salt
1/4 tsp pepper
1 tsp dried rosemary
2 Tbs soy sauce, low sodium
3 cloves of garlic thinly sliced
1 1/2 Tbs cornstarch
2 Tbs sugar
1 Tbs olive oil
2-3 Tbs roasted or toasted sesame seeds
Optional: Soy sauce for serving

There are lots of little steps to this dish but they are all pretty easy. You can do it. 

Directions:

1. In a medium size bowl or gallon sized freezer bag combine the ingredients to marinate the chicken (this can be done in advance and stored covered in the fridge & I suspect it can be frozen but haven't tried it for sure yet). Whisk together half of the garlic, all of the soy sauce, sugar, 1/2 Tbs of the cornstarch, mirin, and worcestershire sauce, salt, and pepper.  Whisk all the ingredients then add the chicken and let it sit in it for 20 minutes. Turning it over half way through to fully coat the chicken. 

2. While chicken is marinating, heat a small-medium skillet over medium high heat and toast the raw almonds for 3-5 minutes. The pan should be empty just almonds. Pretty easy just don't walk away from the stove. Trust me. Burnt almonds = yuck! As soon as you can smell them, or grab one & carefully and taste it, and it seems done, it probably is.  Remove them from the pan and put them in a small bowl. 

3. While almonds are toasting, start your rice. Put all of the chicken stock/broth and rice in a pot and turn it on high until it starts to boil. Reduce heat to low, and cover for 12-15 minutes if making white rice. Otherwise follow the directions on your package for any other kind. Let the rice sit for a 5 minutes and then fluff it with a fork. 

4. In the same pan you toasted your almonds in, put 1/4-1/2 cup of water and all of the broccoli and dried rosemary. Cook it for about 3-5 minutes on high. It should be boiling but the water should not even come up to half of the vegetable. You want it to boil/steam itself to tender crisp. When the broccoli is done, remove it from the pan, 
dump the water out and dry it out. 

5. While rice and broccoli are cooking heat up your indoor grill pan or outside bbq. Pull the chicken out of the marinade and on to a plate or bowl. Remove any garlic pieces that may have gotten stuck to the outside of the chicken these will burn if you don't. Burned garlic = yuck. 

6. Grill your chicken for 5-7 minutes each side. Don't move it around to avoid ripping the thin chicken breast. Once the chicken is ready to be turned over you will know because it will have loosened itself. You can test this by picking up a corner of it. If its easy to lift up the corner, flip it. If you feel like you have to yank or pull it leave it be. Leave the force with Luke. No force needed with chicken. 

7. Heat the olive oil in the same pan you just used for the broccoli (trying to save on clean up later - can you tell?). Add the white onion and sauté for 3-5 minutes. Add in the remaining garlic and sauté for 2-3 minutes watching so it doesn't get dark. 

8. In a cup combine the remaining cornstarch (1 Tbs) and 1/2 cup of water. Dump this mixture into the onions and turn the heat to low. Add the broccoli back in and cook for another 2 minutes while the sauce thickens up. 

9. Serve up the food. See picture below. First a scoop or two of rice goes into each bowl, then the broccoli mixture, then grilled chicken cut on a bias or chopped for kiddos, then green onions for freshness, crunch & color, last but not least sprinkle on the toasted nutty almonds and roasted/toasted sesame seeds. 


Great easy dinner. Took lots of steps to explain it but the flavor combo will win you over and you might even not grab take out the next time you are craving it, and use boneless skinless healthy chicken and broccoli instead. In our house I added some soy sauce to mine but thats just I do that with most dishes like that.... optional.  
from my kitchen to yours