Showing posts with label Appetizer. Show all posts

Saturday, May 2

Buttermilk Fried Chicken Wings


Buttermilk. Fried. Chicken Wings. Lets break this title down into parts. Buttermilk is awesome with chicken. It helps the chicken to stay really tender, gives it moisture, and a tang. Anything fried you know is probably going to taste good and have an amazing texture and crunch. Chicken wings are just fun finger food. I don't know anyone who doesn't like chicken wings. Put them all together and you got a home run finger food fun dinner (its still baseball season, right?). This would be great for a potluck or appetizer. I have always thought that fried chicken is good hot or cold. 

I try really hard to serve healthy things to my family daily, but every once in awhile I cut loose. This recipe is definately one of those moments. To balance the meal out I served the chicken with fresh chopped veggies, and homemade ranch dipping sauce. It was the perfect light side dish to go with the crispy crunchy chicken wings. My 5 year old's only comment while eating dinner was, "how many veggies do I have to eat to go back for seconds for more chicken wings?" My oldest loves fruits and veggies so this is saying a lot. 


Buttermilk Fried Chicken Wings
Serves 3-5 people  (approx 20 pieces)
Recipe slightly adapted from: Jo Cooks


Ingredients
4 cups buttermilk
4 eggs
1 tsp smoked paprika
1/2 tsp chili powder
4 tsp baking powder
3 tsp baking soda
1 tsp salt + more for sprinkling at the end
1/2 tsp pepper
3 cups of flour, divided 
2 lb of chicken wings, drummets and wings divided
half a container of vegetable oil for frying approx 1/2 qt.


Note: Ranch dipping sauce (in the picture above) is: equal parts light mayo & sour cream probably 1/4 cup, sprinkle of salt, sprinkle of dried granulated onion, 2 tsp of dried dill and taste. Occasionally I will add a sprinkle of oregano and garlic but its mostly the dill I want :) 


6 Steps to amazing Fried Chicken Wings

1. Create a three part dredging station: in the first container mix the spices with buttermilk and eggs, in the second container put 2 cups of the flour, and the 3rd and last container/dish have the wings. 

2. Heat the oil on the stove in a heavy pot for even heat.  While the oil is heating up, add in the baking soda and baking powder to the buttermilk mixture. Mix well. It will bubble and foam - don't worry and no its not going to turn into an odd science experiment. 

3. With either fingers or tongs (depending on messy you want to get) Roll the chicken pieces in the flour then the buttermilk mixture then back into the flour again. Put the battered pieces in the third dish while waiting to go into the oil. My family ate in shifts this evening so I fried up 5 of them at this point and covered the rest with plastic wrap and put them back in the fridge. It worked great. Makes me think this recipe could be done a few hrs in advance for a party or football game. Is it football season yet? 

Note: If the flour gets too wet from the buttermilk, too clumpy, dump the wet flour into the trash and use the remaining amount. 


4. Use metal tongs to gently lower chicken wings into the oil. Fry the chicken wings for approx 9-11 minutes each. Don't crowd the pot or the temperature will drop. I kept my stove on med- med high and let the wings cook 6 minutes on the first side and 3-4 minutes on the second side. If the wings are browning too fast turn your heat down.  

5. As soon as the first batch comes out of the oil, put them on a clean dish lined with papertowels and sprinkle on some salt. Salt makes a HUGE difference right here. 


6. Repeat with the next batch of chicken wings until they are all cooked. 

Serve with green salad, crunchy veggies, and or corn on the cob - all good summer warm weather fun eats

Until next time @ Stephanie's Az Kitchen

Saturday, January 18

Chicken Taquitos (a favorite & delicious freezer staple)

Homemade chicken taquitos. I repeated the title again. Could it work? I asked myself. Maybe. I had store bought frozen ones before years ago at a friends house. I knew what they were supposed to taste like. Crunchy on the outside and creamy on the inside. Yummy right? 


One night not long after, I had patiently waited for a night my hubby was at work in case the recipe flopped, and tried out it out. Every once in awhile a recipe flops, and its a bit easier to deal with when its just me and the kiddo. Much to my delight and surprise the healthy, baked taquitos were delicious! 

My next question was if they were freezable and reheatable? AND how good did they taste after reheated? Serious questions here.... I love reheatable food I can send overnight with my hubby to work. Cold lunches like sandwiches don't seem to taste as good for lunch in the middle of the night - if you are up you want something warm and comforting especially in winter. Wanting to make sure I could maintain that great crunchy texture, I froze a bunch, waited a month, and tried them again. Blogging and testing recipes out are so time consuming! My stomach doesn't seem to mind though. 

The results: Yum! They are great freshly made and baked. You can't tell that you used greek yogurt. I love it that they only need a small amount of leftover chicken. They bake really quickly and you don't miss the white flour tortilla at all. When reheating the best is if they are frozen unbaked and the baked when you want to eat them. Reheating them after baking them the next day, in the microwave gave soggy results with no crunch - felt like a bad tiny burrito. The frozen ones I didn't thaw before baking. They were just as good, crunchy on the outside, creamy on the inside, as the first night we made them fresh. 


Healthy Crispy Chicken Taquitos
prep + cook time: 20-25 minutes
adapted from: Tasty Kitchen
Serves 5 people (3 each)
This is what they look like after baking straight from my freezer

Ingredients
1/2 cup plain greek yogurt
1/3 cup salsa verde
1 Tbs lime juice
1/2 tsp ground cumin
1/2 tsp chili powder (*double for spicy taquitos)
1/2 tsp onion powder
1/2 tsp dried or 1 tsp fresh chives
1/2 tsp dried or 1 tsp fresh parsley
2 Tbs fresh chopped cilantro
1 cup of leftover cooked chicken, shredded
(this was 2 leftover bone in chicken pieces from another meal)
1 cup shredded monterey jack cheese
15 whole wheat flour tortillas
1-2 tsp sea salt


Directions:
Mix everything together in a very large bowl. Get your kid(s) involved with this. My son loved helping and it was easy since everything was the fridge. No worry about dealing with sharp or hot things. Dump, pour, mix. 

If you are baking these right now preheat your oven to 425 degrees, and line a large baking sheet or two with foil. Spray the foil with nonstick spray. I didn't spray the foil one of the times I baked them and they stuck a bit. Don't forget this step for easy cleanup. 

Spread the torillias out how over many you can fit on your counter or kitchen table. Put 2 Tbs full in the center of each one and roll them up tight by tucking the ends in first so the filling cannot fall out. Let them rest on the counter seam side down until you are finished with all of them. Repeat with the remaining tortillas and filling until they are all rolled. 

 If freezing for a make ahead meal pack up the taquitos into good quality freezer bags quart size or gallon sized. Write the baking instructions on the bag for easy meals or snacks or football games.  Be sure to use your oven for good results. 

When baking line up the taquitos so they aren't touching. Then spray some nonstick spray on the tops of each and sprinkle them with some sea salt. 

Bake at 425 for 15 minutes - they should be golden, crunchy, and look delicious. Let it sit a few minutes especially if you have kids - the filling inside is hot. 

So next time you have some extra chicken (wink) try this healthy freezer favorite of my family and take the night off from the kitchen.  This would taste with dips such as: guacamole, sour cream, and salsa. Great sides would be tortilla chips, rice, and corn on the cob. 


From my kitchen to yours!


Wednesday, January 1

Chicken Wings & Happy New Years Day

Happy New Year's Day to you. Hello January 1, 2014. It feels weird typing that. I was just getting used to typing/writing 2013. What can you do? Nothing exactly. Well you could finish off some chicken wings with me. They are awesome. I took the same sauce I used on some regular sized chicken and used them on wings instead. It was right before we sent the kiddo to bed, proceeded to drink too much, and stay up watching like 10 episodes of "How I Met Your Mother". Yeah I am exhausted.  It was legend wait for it airy. So back to the chicken wings.... you know the Superbowl is coming up. You are going to need to have some good snacks/apps. Just sayin'. 


Asian Chicken Wings
prep + bake time: 1hr & 5 minutes* if wings are already divided the wing from the tiny drumstick

Ingredients: 
raw chicken wings, divided at the joint if they aren't done already - I used half the tray so like 12 maybe
1 Tbs veg oil
1/2 tsp salt
1/2 tsp pepper
1 Tbs lime juice
1 Tbs chipotle ketchup
3 Tbs hoisin sauce

Directions:
1. Preheat the oven to 375. 

2. Mix the chicken, oil, salt, and pepper in a large ziplock bag or equivalent. Make sure the wings are coated.

3. While the oven is preheating mix the lime, ketchup, and hoisin sauce in a large bowl for tossing the wings in later. Line a cookie sheet with foil. Spray a rack with nonstick spray. Put the rack over the foil for good air and heat circulation (ie...the perfect crispy baked chicken wing). 

4. Bake the wings for 50 minutes - 1 hr and then toss them with the sauce. 

5. Serve immediately & eat while still warm like this cutie munching away at his new years eve feast :)


Enjoy 2014
Happy Jan 1 to you & your family

Saturday, November 23

Thanksgiving Recipe Roundup

So I usually post recipes that are successful on my blog after thanksgiving is over - its nice since I know I am giving out good recipes that work for people, families, and taste good. I haven't ever posted a recipe I haven't made. But it doesn't help those who are looking for ideas to make themselves.... I have been scouring blogs and cookbooks coming up with new ideas myself. There are so many fun ideas this year! I love the emphasis I am seeing of eating better, cleaner :) So I grouped things into two categories... things I have made the last several years that have worked, and my menu for this year including some new recipes I haven't ever tried. 


#1 Here's my "go to" Thanksgiving menu. 
These dishes have been made over and over and over again. The dip made its first appearance last year and was yummy and easy. Appetizers are great if you are having people over early to watch one of the 3 football games.


1. Fruited Cranberry Sauce
2. Super delicious light fluffy rolls   (make extra of these if you are having a small group over - they freeze wonderfully & if you make the extras bigger than all the rest - they are the perfect hamburger buns. 

See this link: http://stephaniesazkitchen.blogspot.com/2013/02/chipotle-herbed-burgers-welcome-spring.html for picture and recipe on how to use these rolls as hamburger buns.


3. Hot (not spicy) Italian Cheesy Dip
4. Buttermilk Sausage Cornbread Stuffing 


Group #2 This year's Thanksgiving Menu 
click on the title to see the recipe on another blog/website

breakfast: Crockpot apple butter made the weekend before & scones made the day before


App: Sliced Veggies & Homemade Ranch Dip

App: Homemade Honey BBQ Baked Chicken Wings (leaving the alcohol out) 
App:  my take of this recipe halved- super excited to transform it with my favorite pizza ingredients Pizza Potato Skins

Turkey (made with fruit, fresh herbs + butter)
Side: Buttermilk Sausage Cornbread Stuffing (See link above)
Side: Fruited Cranberry Sauce (see link above)
Side: Soft Rolls (see link above)
Side: Gravy (pretty standard = flour + turkey drippings + stock)
Side: White Rice- its a tradition at my house 
Side: Rutabega Pear Mash (serves 10 perfect  for leftovers to go with chicken or as a topping for shepherds pie later in the week)


Thursday, August 22

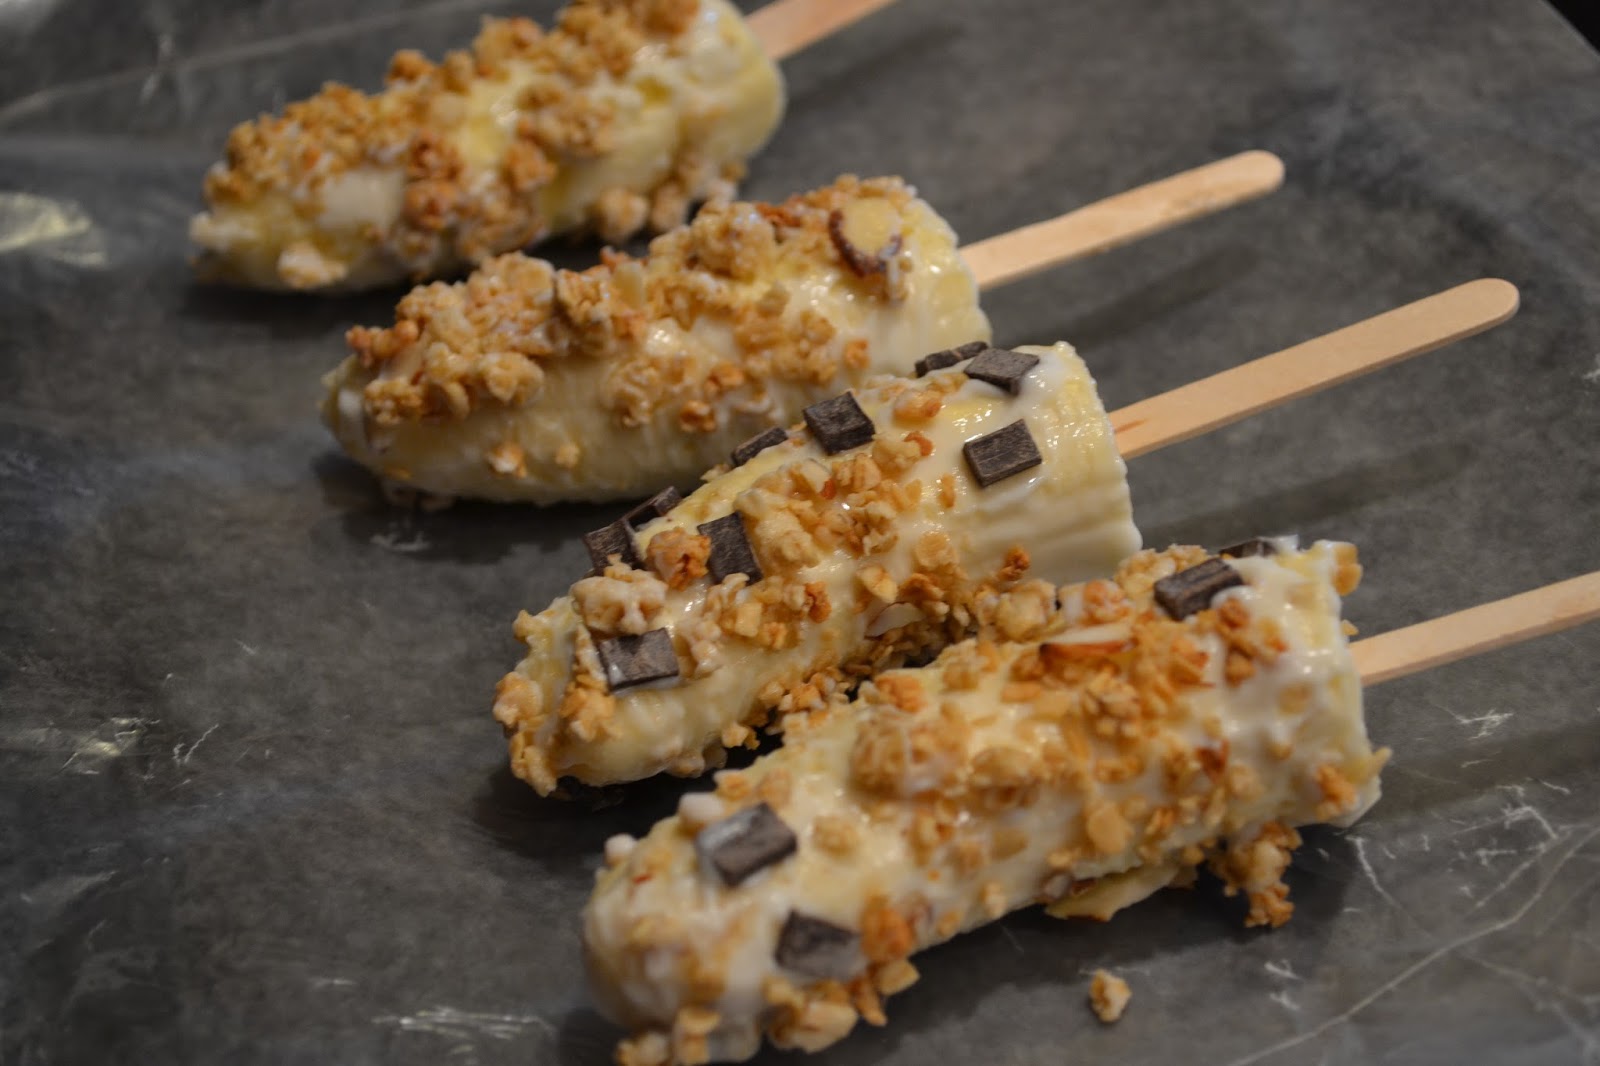
5 Ingredient 5 Step 5 Minute Banana Breakfast or Dessert


These banana creations are exactly what you need to be having this summer. Chances are you have most of the ingredients already. Its only 5 ingredients and 5 steps. Super easy.

Its been averaging 109-115 degrees lately here in southern Arizona. Football season is starting very soon and all I can think about is trying to stay cool and calm and get through the last bit of summer. Last September was awesome 90-100 degree bbq weather. I loved every minute of it. But its not September yet so I need to cool my jets and eat another one of these yummy pintrest banana creations. Try one or five. I promise you'll like it. 

Also love this little creation for its flexibility. You can use your kiddos favorite flavor of yogurt, use nuts instead of granola, dip and cover the bananas in almond butter, peanut butter, or dip in any kind of chocolate for a fun easy kid friendly dessert. AND unlike all those ice cream type desserts your banana won't melt all over your floor!  


Long live bananas :) 

                        Recipe's author is  Chocolate Covered Katie - a healthy desert blog. 
This recipe makes 4 servings
Takes 5 minutes to prep + minimum of 4 hrs of freezing time on parchment lined cookie sheet for less mess 

Ingredients

2 bananas, cut in half

1/4 cup plain organic yogurt 

1 handful granola your choice, you want it small chunks (large ones tended to fall off) if you have clusters just hit them in a plastic bag with a rolling pin or unopened can of food 

small handful of your favorite candy, pieces of chocolate, or small chocolate chips

4 popsicle sticks (this took me forever to find... don't know why the regular grocery stores didn't carry it... check micheals or another craft store if you need them)

directions 


Thanks for stopping by!
Stephanie

Tuesday, April 2

Pizza Bites (Freezer - Friendly)

Happy April - Spring! We made it. Well here in Arizona I would say spring is almost past as we head into the 90 degree weather days. If you live in a colder climate and spring is finally deciding to come, here is an easy freezer meal for you to have ready for busy days. These taste so much better than the store bought ones! This isn't just kiddo food. Sub the mozzarella for a more flavorful cheese and really have fun with this! This is also a good way to sneak some whole wheat pizza dough past your kiddos.  

Makes 12 pizza bites for your next easy lunch, dinner or party. If you are starting from already made pizza dough takes about 20 minutes to assemble and bake.


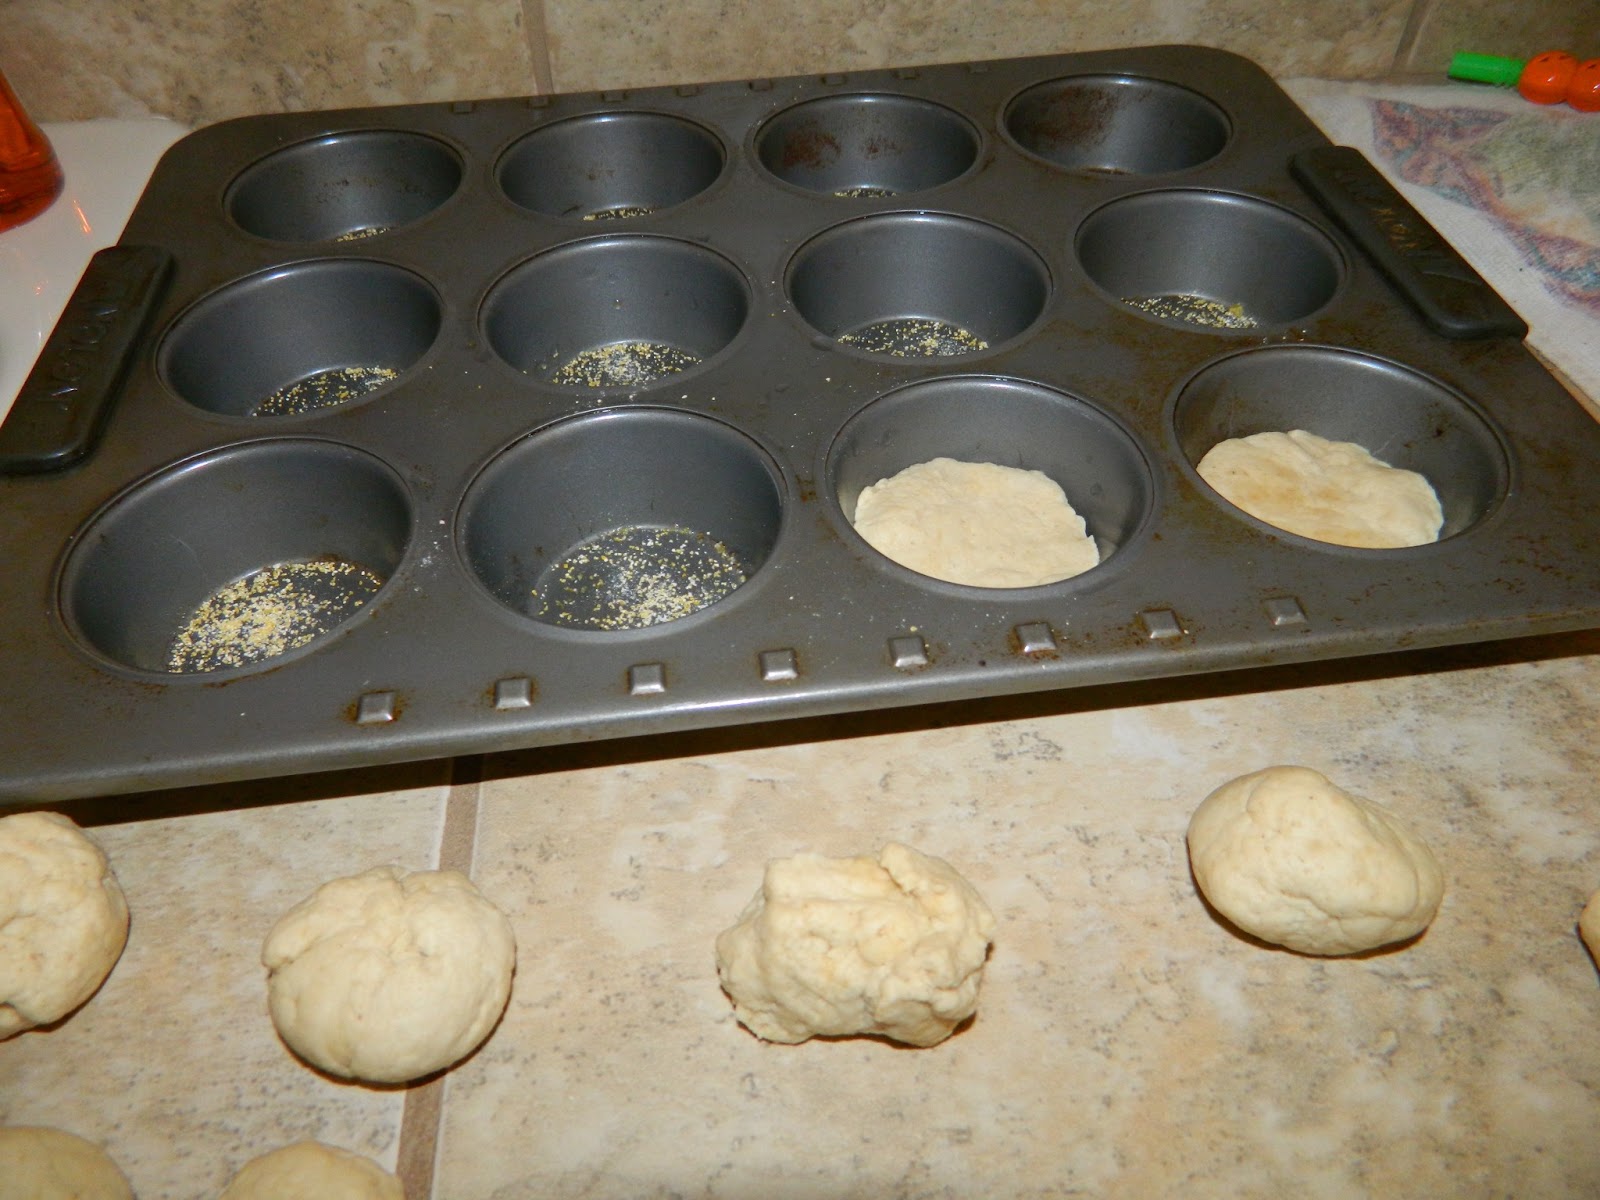
 Step 1 make or buy some pizza dough. Divide the dough in half. Store one half in the fridge to use later or keep it whole to double the recipe. Put some flour on your work surface and roll the pizza dough into equal little balls. Spray some non-stick spray on the bottom and sides of each muffin cup to prevent sticking plus a tsp or less corn meal for good measure.


Step two  finely dice a quarter of red pepper per 12 pizza bites. Press the dough into each muffin cup. Sprinkle approx 5 diced bits of red pepper in each. 

Step 3  sprinkle 1 Tbs mozzarella cheese over the top of each muffin cup (hiding the veggies - wink).   


Step 4 dice up 5-8 pieces of pepperoni (1/4 of a package) and sprinkle them over the top or use whatever toppings you prefer on your pizza. I averaged about 3-4 tiny pieces on each one. 

Note: I diced all the toppings finely for my kiddo but it might be prettier as an appetizer to leave bigger chunks.

Step 5 Bake at 350 for 10-15 minutes until they look done. Let cool on a cooling rack. 

Step 6 Store in the fridge for a few days. Store in the freezer in a food freezer bag for up to 3 months. To reheat microwave them for 30 seconds intervals until you reach the temperature you want. Delicious!

Enjoy Spring
Get outside 
Use this Freezer friendly meal to help
From my kitchen to yours! 

Monday, February 18

Bacon Guacamole


I stumbled upon something truly remarkable yesterday. Bacon is known to enhance flavor, but yesterday's discovery was nothing short of EPIC!!
Combining bacon and guacamole tasted soooo good it made me want to sing, and dance across the room. 

Overall, this recipe is remarkably easy, quick, and accessible, even for novice cooks. As football season approaches, consider preparing homemade guacamole instead of store-bought options, as it requires only a few ingredients and 10 minutes of preparation time.


Serves 3 or 4 or 2 
(depending on how hungry you are?)
Recipe from Kevin at Closet Cooking

Bacon Guacamole Ingredients

2 large ripe avocados
1/4 of a red onion approx 1/4 cup ( I didn't measure)
1 jalapeño ( I took the seeds out of mine since I have a youngster)
2 Tbs cilantro (healthy handful)
1 medium sized tomato, diced
1/4 tsp salt. kosher, course
1/8 tsp pepper
1/4 tsp cumin
1 tsp lime juice
1 tsp lemon juice (added this to the original recipe)
4 strips of bacon, cooked to a crisp


Directions

1. Cook the bacon until crispy. Pat the grease off and crumble it into a small bowl

2. Mash the avocados slightly, in a medium sized bowl, if you like chunky guac, just leave it all in chunks

3. Combine all the ingredients in the medium sized bowl.

4. Taste and adjust the seasonings as needed. This was pretty mild as far as heat. I kept it on the mild/medium side for my kiddo, but feel free to add heat by adding another jalapeno, more pepper, or even some red pepper flakes.

5. Serve with chips or on tacos or just grab a spoon! 


Enjoy! 
Steph ❤️

Wednesday, February 13

Nutty M&M Granola Bars


If you do really enjoy nuts, you are going to love this crunchy nutty granola bar! If you don't.... welll I don't know if I can be friends with you. Just kidding. I found this recipe on one of my favorite food blogs, ever. Please check out her site: www.farmgirlgourmet.com. This girl knows how to make good wholesome food like what your mom or grandma would've put on the table... no can of whatevers in her her recipes. Absolutely delicious!

I have made this a few times and each time I get better at waiting. Not better at making the recipe, you heard me right. I get better at waiting. This recipe is a cinch to make and most of the ingredients are easily found at the grocery store. It is the waiting that is hard. I am talking about the point in which you pull out the bars from the oven and see them just sitting on the top of the stove cooling, and know if you have to wait before you can cut them or they will crumble. So you can see them, smell them, but you can't touch them until they are FULLY cooled. So far I haven't been able to make it without at least couple crumbling while cutting. Each time I do get better. That smell of yumminess in the oven gets me every time. Its like those commercials where the mom is trying to get everyone to do something together so she whips up a batch of cookies and tad dahh everyone comes. The power of baked goods.... is amazing.


If you cannot wait and some of it does crumble keep the crumbles in a zip lock bag. They are awesome the next morning with some plain Greek yogurt. So if you thought granola bars were only found at speciality places or out of box from the grocery store, you must try this. It is so easy and takes only 10 minutes of active hands on cooking. 25 minutes to bake and approx 45 minutes to cool it down. Easy recipe. Hard to wait.


To make these sweet, healthy, chocolate, nutty, M&M granola bars gather the following ingredients:

1/2 cup Unprocessed Bran or Wheat germ
1/4 cup brown sugar
1 cup sliced or silvered almonds (both works well)
1/2 cup peanuts, I used salted (plain works well too)
1/2 cup honey
1/2 tsp salt, kosher, course
1/4 cup chocolate protein powder
2 cups rolled oats
 1/2 cup sunflower seeds, raw or salted (this time i used salted)
2 Tbs or 1 oz of unsalted butter (lots of salt already going on with the nuts)
2 tsp vanilla extract (although am going to try walnut exact next time)
6 oz (half of a bag) peanut m&ms (different colors for different seasons would be cute too... red m&ms for valentines day  


Not super great with a knife. Should've waited another few minutes before cutting but wow did they taste good! 

Directions

1. Preheat your oven to 350. Mix the wheat germ/bran, almonds, peanuts, and rolled oats together in a large bowl. Once combined dump the bowl onto 2 baking sheets. Shake the pans a few times to flatten them out.

2. Toast the nut mix for approx 10 minutes. Shake the pans every 2-3 minutes and stir if the outside edges start to turn dark. 

3. While the mix is toasting up, grab a small or medium saucepan to melt the butter, and combine the honey, vanilla, and brown sugar. Keep it on low - you do not want this to boil. 

4.Once the nut mixture is toasted pour it back into the original large bowl. Add in all the rest of the ingredients and toss together. I smashed about half of the m&ms before combining them in the bowl because they were the medium sized kind and I didn't want them too large. If you don't have m&ms choc chips are an awesome replacement. 

5. Pour and stir the honey mixture into the bowl until everything looks coated. Turn the oven down to 300 degrees. Pour the oat/nut mixture into a buttered baking dish. Grab a sturdy spoon or a metal spatula to press the granola mixture flat into the baking dish. Press down firmly. I used 11 X 7 (my largest glass casserole dish). 

6. Bake the granola for 25 minutes. 

7. Let it cool for approx 30 - 45 minutes. Should be cool to the touch - no heat at all. Run a knife around the edges of the dish to release the granola from the dish. It should come out with no resistance as one large piece if you have buttered the dish well. Cut into squares or rectangles and eat! I mean share with your friends and family. Store any extras (if there are any) in an air tight container. The original recipe says they keep good for a week although I wouldn't know because they don't last that long in my house. 

See its easy. Great after school snack, football/baseball/soccer snack, or to eat with lunch.

From my kitchen to yours

Friday, November 23

Italian White Pizza Dip


I hope you had a good Thanksgiving. Since turkey and football are equally important in my house, this year I was super excited about trying out lots of new "football foods" as the "real food" cooked in the oven, roaster, and stove. So starting off with the best thing I ate yesterday....this new hot cheesy rich Italian sausage homemade dip recipe. It was AMAZING!  This serves 3 - 5 people. But I should put that I accidentally ate half of this recipe while watching the Lions game. It was warm and gooey and cheesy and I couldn't stop. LOL don't be like me... Invite people over to eat it with your or bring it to someone's house. Any where you eat it I know you are going to enjoy it. 

Ingredients:
1/2 of a pint grape tomatoes
1/2 tsp canola oil 
1/8 tsp salt ( I used a course grind)
1/8 tsp pepper ( I used a course grind)
4 1/2 oz cream cheese
8 oz shredded mozzarella cheese
1/4 lb mild ground pork sausage (mild, sweet, Italian)
1/4 cup fresh basil
1/2 Tbs dried parsley
1/8 tsp garlic powder
1/2 Tbs Italian seasoning blend
1/2 Tbs minced garlic


Directions (super easy):

1. Preheat oven to 400

2. Line a baking sheet with foil


3. Place tomatoes on top of foil and sprinkle them with salt, pepper, and oil - make sure they are coated


4. Roast them until they burst approx 15-20 minutes


5. While they are in the oven - use the stove to fry up the pork. Drain the fat away and reserve the meat. 


6. Once the tomatoes are done and cooled a tiny bit - cut them in half

7. In a bowl stir together: the tomatoes, 4 oz of shredded mozzarella cheese, cream cheese, and fresh basil, parsley, garlic powder, minced garlic, and the cooked crumbled sausage


8. Divide the cheesy mixture into two ramekin/baking dishes


9. Top each baking dish or one large one with the rest of the shredded cheese and the 1/2 Tbs Italian seasoning blend. 


10. Bake for approx 15-20 minutes until its bubbly and golden 


11. Serve with tortilla chips or bread 


Enjoy the rest of football season!

From my kitchen to yours