Showing posts with label Rachael Ray. Show all posts

Saturday, July 11

How to add a new vegetable to your life - Italian BBQ Sausage Patty Melt with Broccoli Rabe

Summer to me means bbq. Yes I think in terms of pictures and or food. Its a gift or a curse depending on how far I am away from the kitchen. So as the smell of the bbq fills the weekend air, its the perfect time for a cheeseburger. But...summer also has that conflict between eating lots of grilled foods and still being able to look good in a pair of shorts. Its over 105 degrees at my house... shorts and t-shirts are a must. So let me show you an easy way to add a new veggie into your life with a cheeseburger instead of a salad.

Who doesn't love a good cheeseburger? 

Cheeseburgers are familiar, easy to bbq, great for company and kids. Lets imagine what if our juicy everyday cheeseburger met up with a cheesy patty melt, went on vacation to Italy, and had a burger baby.... that would be the perfect place to put a new vegetable. Not crazy but had two cups of coffee and was up twice with a baby - not exactly running on a ton of sleep but stick with me. I promise real good eats... Think about all those great Italian flavors: onion, garlic, paprika, provolone cheese wrapped up between two of your favorite hamburger buns or lettuce leaves*. 

*P.S. Lettuce wraps in the place of a bun wouldn't work here without some major modifications but if you grilled some romaine it could work and you really could get that great summer bbq smokiness. Just grill the lettuce separately from the meat and the cheese and skip the patty melt part.


What new vegetable are we talking about here? 

This week my family had broccoli rabe for the first time. This veggie may be old hat for those well versed in the produce department but I was pretty excited. I was even more excited when my family ate it without even blinking an eye - maybe the super melted cheese and yummy Italian cheeses and meat helped. I didn't even have to ask the people at the store to help me find it because I googled pictures of it on the way there! Yeah some people google people, I google food. I know I am a little obsessed.  

You should try this this new to me veggie because it is fun and tastes great. Broccoli rabe is a leafy veggie with little tiny broccoli crowns about the size of a small bouncy ball or a 3d quarter hidden around the leaves. It does taste similar broccoli thus its name. But a milder broccoli taste with a sassy surprising edge that reminded me of the difference between parsnips and carrots. It is loaded with nutrients like fiber, protein, vitamins A, B-6, B-12, C, iron, calcium, and magnesium. So skip the multi-vitamin and try a burger recipe and a new vegetable into your diet. 

I found this patty melt recipe in an old Rachael Ray cooking magazine 3 years ago. Like most Rachael Ray recipes it has a long list of ingredients. While I am sure this Italian beaut is worth all the effort, I have a sick little guy, and a household to run, so I simplified it, creating a fun twist with a bbq that uses less ingredients, less time, and less dishes than the original recipe. This amazing burger creation, my really really good Italian bbq Sausage Patty Melt with broccoli rabe took less than 25 minutes. Your taste buds will love it, and your body will love another dose of healthy. 

Who says comfort food can't be healthy? Lets slice up some watermelon, grill up or boil some corn on the cob, and lets get this summer weekend food started! 


Italian BBQ Sausage Melt with Broccoli Rabe
Recipe adapted from: Rachael Ray Magazine 
Serves 3 adults

Ingredients
2 handfuls of Broccoli Rabe
1 lb of sweet Italian ground sausage
1/3 cup of grated good quality parmesan cheese
softened butter (for spreading on bread)
6 slices of provolone cheese 
6 slices of thick bread like texas toast 
salt and pepper

Directions
1. Bring a medium pot of water to a boil and drop in the leaf parts of the broccoli rabe

2. Sprinkle it with salt and cook for approx 3 minutes over medium heat

3. Drain thoroughly, you don't want wet cheeseburgers, and set aside to cool. It will look similar to cooked spinach. 

4. While the cooked veggie is cooling, in a bowl, mix together the meat, cheese, another sprinkle of salt, pepper, and start preheating your grill. 

5. Going back to the vegetable, use your fingers to pull any tough stem pieces out of the cooked green mass of broccoli rabe and chop up the rest. 

6. Add the cooled veggie to the meat mixture and form into 3 large patties. 


7. Grill the patties until they are done. I used a combo of high heat to get a great crust and then lowered it to finish off the burger with less direct heat. Do not flip them more than once. Remember this is sausage and not beef and it is safer to cook pork all the way through. As of 2011 there are new USDA guidelines for pork cooking temperature to help keep it juicy and not cardboard - you can pull it off once it hits 145 as long as you do a 3 minute rest period so it can continue cooking a bit more off the heat. You can read about that here. I prefer to stick with what I know and thats 155-160 but thats just me. 

(I did this last steps inside my house on a cast iron grill pan. My little guy was fussing and I wanted to hold him while my hubby helped.) 

8. Lets build the patty melt! On a grill pan or flat plan make the patty melt part. Heat the pan. Butter one side of 3 pieces of bread. Put the butter side down on the pan. Put one piece of cheese down on each slice of bread. Put one cooked Italian sausage burger patty on each slice of cheese. Top the meat with another slice of cheese and the remaining bread. Carefully spread a bit more butter on the top slice of bread. 


9. Grill until the cheese is melted on the bottom and the bottom bread is golden and toasted. Carefully flip. I had to hand my little fussy one to my husband for this part, because it called for two hands. I tried it with one and the bread tore and I had to redo one sandwich. So don't be like me. Use two hands, a good spatula, and go slowly. 

10. Once all the cheese is melted, and the bread is toasted and wonderful, you are done. And since you are trying a new veggie you don't have to worry about making sure you family gets another veggie on their plate. If they do its just another bonus. Summer is a great time to add crunchy cold veggies with or without dip to any burger meal. 


Golden, creamy, crunchy, meaty, and huge - this Italian BBQ Sausage Patty Melt with Broccoli Rabe will make your taste buds feel like that they have visited Italy. Enjoy. 
From my Az Kitchen to yours,

Stephanie


Friday, December 13

Cookie Cutter Stew

Do you like to play with your food? I am not talking about playing with mashed potatoes like my son used to do in high chair, making shapes & letters all while having a really good time. Not talking about flinging food across the table at your spouse either (although that seems appealing). Playing with food as in like getting creative with it. If you do, you'll love this recipe. While we are on this subject I admit I am HORRIBLE at crafts so if you happen to be in that same boat. Let me reassure you this is EASY and FUN. 


I heart this stew.... This blog has been a bit one sided lately (heavy on the soups, stews, and chili) but honestly that's I have wanted to eat & cook & thus blog. It's winter what can I say. I just returned from a trip back where I grew up in the northwest and it's really really c-o-l-d there! Which brings me to this warm, inviting, fun, playful, kid friendly, veggie laden, cookie cutter stew. I promise it is just as much fun to make as it is to eat! 


cooking time + prep time: about 2 hrs 15-20 minutes*
*time may seem daunting but make this on a saturday or sunday for an easy way for the whole family to spend time together. Everyone can make their own specific shapes. 
Most of it is hands off cooking.

Recipe is adapted from Rachael Ray Magazine April 2013
serves 4

Ingredients: 
2 cloves of garlic, crushed & rough chopped
1/2 tsp salt
1/4 tsp pepper
just over 1 lb. beef chuck cubes
1 onion, rough chopped
4 carrots, cleaned & rough chopped (peel it if you want to)
3 parsnips, cleaned &rough chopped (peel it if you want to)
1 cup of water
1/2 Tbs olive oil
1 cups of beef broth
1 Tbs tomato paste
3 Tbs flour, whole wheat white plus 1/4 cup for sprinkling
1 sheet of thawed puffed pastry
1 1/2 cup of frozen peas (eyeball it - one small package)


Directions:
1. In a dutch heat the olive oil over medium heat. Preheat the oven to 325 degrees. 

2. Pat the meat dry, sear the meat on each side using tongs or a spatula - about 3-5 minutes

3. Set the beef aside on a plate.

4. Add the onions to the dutch oven and saute for about 4 minutes until they are soft.  Add in the garlic and cook one more minute - stir

5. Add the flour to the dutch oven and let it start to cook out... stir. Mixture will be dry. Let it cook for one minute before adding the broth and the tomato paste (in that order). 

6. Dump the meat into the dutch oven including any meat juices that may have gathered on the plate. Add salt and pepper. 

7. Cover and bake in the oven for 1 hr & 45 minutes.  

8. Add in the carrots and parsnips. Cover and return to the oven until they are soft about 15 minutes. 

9. When the stew is finished in the oven let it rest on top of the stove while the cookie cutter shapes bake. 

10. Making cookie cutter shapes: When stew is almost finished put some flour down on a clean smooth kitchen surface such as a cutting board or counter. Increase the oven to 400. Line a baking sheet with parchment paper. Unwrap the tri-folded puff pastry and start making whatever shapes makes you smile. Put the shapes directly on the parchment paper. 

*Note: wait until you are ready to make any cookie cutter shapes before taking it out of the plastic and letting it sit in the air. The softer it gets/the more time unwrapped, the harder it will be to move it. Bake this for 15 minutes or so until they are golden and puffed. 

11. Stir the frozen peas into the stew. Taste and adjust seasonings. Serve and top each stew with a few cookie cutter shapes. The frozen peas will cool the soup slightly, the hot stew will warm the peas, and the peas will keep their lovely green color since they aren't being boiled to mush :)  Enjoy! 


Despite the season of cold - blessings of warmth to you in this dish
from my kitchen to yours

Tuesday, November 19

Two Cheese Sausage Baby Broccolini Frittata


I found this recipe in a magazine when I was looking for something healthy and easy for breakfast. It was my first time using baby broccolini and was very happy with the results. It's very similar to broccoli but actually easier to eat because it isn't as dense. Definitely try it if you haven't! My husband who found my leftovers in the fridge wasn't quite as happy, but he has some personal issues of mixing veggies with eggs that he needs to work on. So you'll have to trust me on this one. If you like omelets and frittatas with veggies - you'll love this... if you don't leave out the vegetable. But you know veggies make all that cheese and sausage okay, right?


Two Cheese Sausage Baby Broccolini Frittata
serves 4
prep time + cooking time: 20 minutes
adapted from Rachael Ray recipe, click here for original 


Ingredients:
4 eggs
1/2 cup milk
5 Sausage links, chopped into chunks
1 cup grated/shredded cheddar cheese
1oz Parmesan cheese sliced/shaved thin
1/2 lb baby broccolini
1 shallot, diced
1 Tb olive oil
optional: fresh basil, sliced & sprinkled over cheese after finished baking


Directions: 5 Steps
1. Cut the sausage into pieces and cook them for approx 5 minutes in a oven safe skillet. 

2. Add in the veggies. Sauté the baby broccolini and shallot in the olive oil for approx. 5 minutes over medium heat

3. Mix/whisk the eggs and milk together in a bowl or cup. Pour the mixture over the veggies and meat. Let it cook for 5 minutes over low heat to let it "set". 

4. Sprinkle the cheese over the top and bake in the oven at 350 for 5 minutes.  Should be golden colored and eggs no longer jiggle or shake when moved. 

5. Let cool briefly (will be easier for slicing) and dig in to your healthy & filling breakfast! 

From my kitchen to yours 

Monday, November 11

Fall Weather & Toasted Orzo Chicken Soup

Something about me.... I love soup. I counted and have 14 soups, stews, and chili recipes on my blog (some are listed below for further reference). Soup makes me feel content and comforted. I grew up in a cold climate near Seattle, and every fall something in me just wants hot, nourishing soup. 


my fav way to eat soup: in a large coffee cup (I am from seattle) with really good whole grain bread and cheese

I made this soup about a month ago. I was really excited to try it orzo for the first time. I did have an awesome visitor from the great northwest (my mom) whom I hadn't seen in WAY too long, and with whom I was happy to share some sun. So without further ado...heres your new tasty chicken soup recipe perfect for a colder November day (not that we are having one here in Arizona - but I do understand other people are experiencing real seasons). 

This toasted orzo soup is from a Rachael Ray magazine, Feb 2010 issue. Isn't orzo a fun word to say? I heart trying new foods. My husband really didn't care for the texture of the orzo itself but he liked the rest of it. I thought it was wonderful - but it was the first time either one of had eaten this specific kind of pasta before. Infact my son tried to convince me that it was rice because he didn't believe it was "noodles" his word for pasta. The hardest part about this dish is making all the veggie cuts small into a fine dice. If you are able to pull that off, this veggie laden, colorful delight looks like confetti. The best part of the dish is that all you are doing is chopping + dropping into a large simmering pot. 

When should you make it? Now. Of course. No really. Soup is one of those perfect meals to do on a weekend, keep on low while people come in, and out busy with fall activities. You can skip the first part of the recipe by using up leftover chicken from a previous meal or a rotisserie chicken from the store. Soup also reheats beautifully into a make ahead meal for later in the week. Serve it with a fresh green salad, crackers,or some rolls. 


Chicken Soup
prep + cook time = 35-45 minutes
Serves 4-6 depending on your appetites

Ingredients:
4 cups (one 32 oz container) of chicken stock/broth homemade or store bought
1 pound of chicken, boneless, breast pieces cut into bite sized pieces (this was 1 1/2 breasts for me)
2 Tbs unsalted organic butter
3/4 cup orzo pasta
2 Tbs olive oil
2 stalks of celery, finely diced
2 dried bay leaves
1 small sprig of thyme & rosemary each (tied together if you can)
1 small to medium zucchini, finely chopped
1 carrot, finely diced
1 large red bell pepper, finely diced
1 large shallot, finely chopped
3 cloves of garlic, finely chopped
2 cups of frozen peas, keep frozen until the end
3 cups of water
1/4 cup parsley, finely chopped
2 tsp grated lemon peel
salt & pepper 

Directions:
1. In a medium pot, bring the chicken stock and the chicken to a simmer. Once the stock starts to boil, reduce the heat, cover with a lid, and poach the chicken for 12 minutes. 

2. In a large soup pot or dutch oven melt the butter over medium heat. Toast the orzo in the melted butter until its golden color - approx 3-5 minutes. Keep an eye on it. As soon as it is toasted use a spoon to move it aside on a plate or bowl. See the picture below.


3. While the pasta is toasting - chop all your veggies. 

4. Add the olive oil to the dutch oven and all the veggies. Season the veggies with 1/2 tsp salt and 1/4 tsp pepper to help them to start softening. Stir occasionally for 7-8 minutes until veggies are tender crisp. 


5. Build the soup. Return the orzo to the dutch oven. Add in the chicken pieces from the stock with a slotted spoon. Skim off any extra fat that may be floating at the top of the medium pot of stock, and then add in all of the liquid. Add in the water, bay, and fresh herb bundle. 


6. Bring the soup to a boil and let it cook for approx 5 -6 minutes until orzo is done. In the last minute of cooking add in the frozen peas. 


7. Turn off the heat and stir in the fresh parsley and lemon peel. Remove the bay. Taste & adjust any seasonings. 


8. If using as a make ahead meal, cool completely. Cover & refrigerate. I am not sure it makes a difference to separate the pasta from the soup if you are reheating it. If if bothers you go ahead and keep the orzo separate until the night you are going to serve it. I did notice (when I didn't separate it) the pasta does plump up in size more the next day but it doesn't change the flavor or texture. 


Easy Yummy Healthy Chicken Soup
Enjoy fall weather 

Sunday, October 13

Challenge 30 New Recipes in 30 days: Half Way Mark!

So this entry isn't about a recipe. But I think its a valid entry if you have been following my blog and know of my cooking/blogging goals. Have you ever been excited about a personal goal and worked hard to race towards it? How about when you set a goal and you are mid-way into it and all of sudden it started to feel like work? Did you make your goal or was it just out of reach? There's something definitive and measurable about making a goal. I guess it makes me feel good as a person. Our society promotes productivity as a whole. It becomes attached to self-worth of a person or entire people groups in some cases - but that's a separate issue. 

Recently, last month I posted a goal I wanted to achieve - cooking 30 new Rachael Ray recipes in 30 days. The goal was to cook and blog more constantly - everyday for a month. Turns out its a bit harder than I thought it would be - especially after a couple recipes just flopping. I do like challenges though and the first half is officially done! 


First Half Recipe List(plus one)

1. Avocado Tuna Bacon Salad (with homemade bacon mayo)
2. Rachael Ray's Spanish-Style Enchiladas
3. Rosemary Leek & Yellow Squash Soup
4. Pumpkin Spinach Quesadillas
5. Easy Braised Veggies in a Cream sauce
6. Crunchy Tarragon Chicken: Winner Winner Chicken Dinner
7. Beef & Spicy Chorizo Zucchini Chili
8. Turkey Curry & Cucumber Relish
9. Garlic Flatbread (eat with the ground turkey curry dish)
10. Sausage & Pepper Bacon Breakfast Muffins
11. Homemade Creamed Corn - Easy Side Dish
12. Peppered Candied Bacon & Egg Burgers on Ciabatta Bread
13. Grilled Chicken Broccoli Bowls (Take Out Fake Out)
14. Whole Wheat 3 Cheese, Kale & Sausage French Bread Pizza
15. Kale & Sausage Pasta
16.Spicy Zucchini Chicken Enchiladas w/ Creamy Tomatillo Sauce

My personal top favorites dinners of this list were the kale & sausage pasta, tarragon chicken, the spicy enchiladas (perfect heat level & make-ahead meal), and the bacon egg burgers. What a great two weeks of eating! Favorite side dishes were the garlic flatbread - I think I could eat that with anything, and the braised veggies. Yum! 

Please note I will be back in about a week to finish the second half of my Rachael Ray recipe list. I will be out of the kitchen this week recovering & taking it easy from a little outpatient thing I had yesterday. Have a great week!

Keep cooking :) 
from my computer to yours

Friday, October 11

Spicy Zucchini and Chicken Enchiladas with Creamy Tomatillo Sauce


I have been on a zucchini kick lately. Its been fun. What a great way to use up that end of summer produce than to put it in cookies, soups, stews, add it to pasta, ect. I must admit I had never put zucchini into enchiladas until now. The result was something easy, quick, freezable, super spicy, and best of all super yummy! The original recipe didn't have chicken or zucchini but thats okay. We are meat eaters in my family. I think if would've made the rice and bean enchilada recipe as written I might've been asked to order a pizza after "dinner" was done. We don't do the whole meatless monday trend. I would rather eat lots of meat and stay away from the processed foods. Thats a whole different trend with our culture we should talk about another time.....until then you definitely should try this lovely adaptation from Rachael Ray's Everyday magazine October 2012 issue


serves 6-7 (2-3 each)

Ingredient list: 
1 heaping cup or 4 oz shredded/grated pepperjack cheese
1 heaping cup or 4 oz shredded/grated montrey jack cheese
1 whole jar of medium thick and chunky salsa verde
1 yellow squash, finely diced
1 zucchini, finely diced
1/2 tsp salt + 1/2 tsp salt
1/4 tsp cracked peppercorns
1/2 cup of white rice 
1 bay leaf
1/2 tsp taco seasoning (homemade or store bought)
2 scallions or green onions, thinly sliced
4 oz cream cheese cut into chunks
12-15 small corn tortillas
1/4 cup or 1 large handful chopped cilantro plus another handful for garnishing (optional)
2/3 cup half and half
3 chicken breast halves (previously cooked) leftover chicken from another meal would be great, finely dice it up

Directions:
Step 1: Cook the rice. In a small pot put 1/2 tsp of salt, the bay leaf, taco seasoning, the rice, and 1 cup of water together. Bring the water to a boil. Reduce the heat and cover for approx. 12-15 minutes. Fluff with a fork when you are done and transfer it to a bowl to start cooling down. 

Step 2: Make the sauce. In a blender or food processor combine: the salsa verde, half and half, and cilantro. Should be a creamy thick liquid. 

Step 3: Sauté the veg. In a small saucepan or skillet sauté the veggies for 3-5 minutes on medium or medium low with salt and pepper until they are tender crisp with butter or olive oil your choice. You don't want them browning just softening.


Step 4: Assembling. Combine the cooled rice with half of the jack cheeses, the green onions, diced cooked chicken, sautéed veggies, and cream cheese. Take 1/4-1/3 cup portions and put them in the center of each tortilla and roll them up. Place the filled tortillas side by side in two prepared baking dishes. When all the tortillas are filled, or you ran out of room in your pans, or ran out filling (all common issues with making enchiladas or burritos) top each baking dish with the lovely creamy sauce. Cover the sauce in both pans with the remaining cheese. 

Step 5: Bake at 350 for 20 minutes until bubbly and delicious 


Step 6: Serve with sour cream, tortilla chips, and additional cilantro 

Enjoy zucchini & other end of summer/fall favorite flavors
from my kitchen to yours

Thursday, October 10

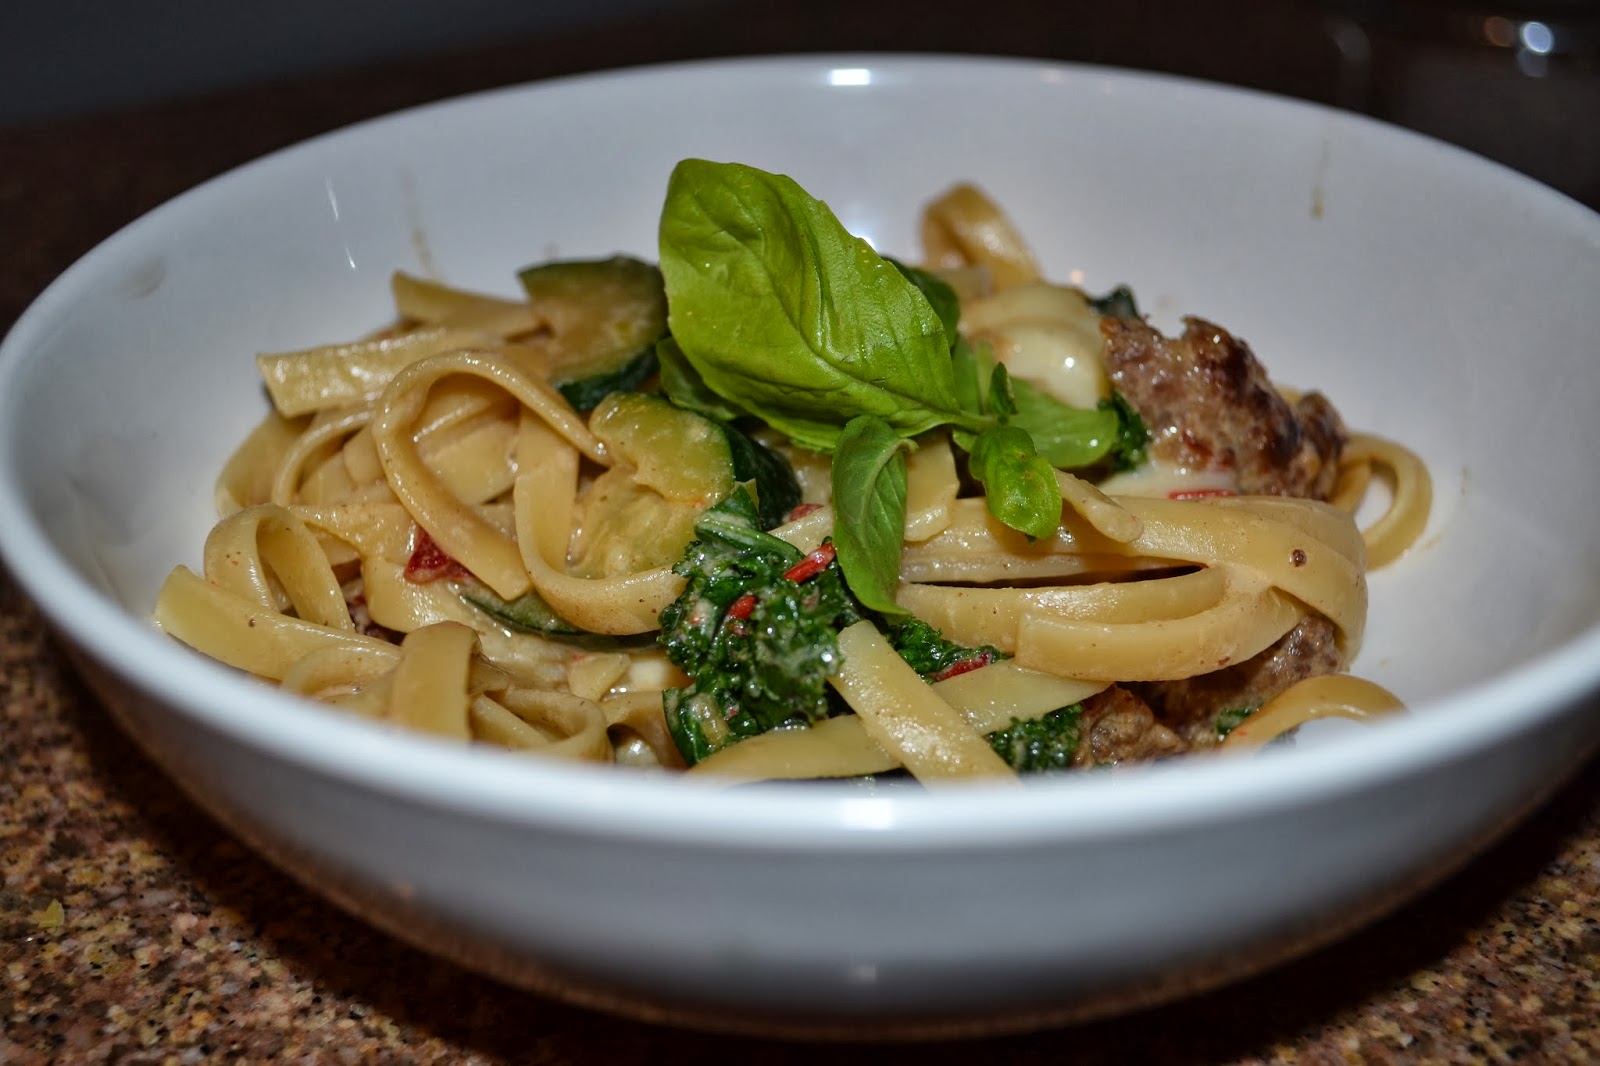
Kale & Sausage Pasta


Pasta used to be my favorite food. I would make it 4 or 6 times a week. I still love it, but my approach to food has changed. I can't eat like that anymore - Anyone else know I am talking about here? So now I make it like twice a month. So you can imagine when I make it, its going to be awesome. I am not going to waste my pasta cravings on a box of mac & cheese from the store that tastes like cardboard. There are only a handful of recipes I will make. This recipe, number 14, in my personal goal of making 30 new Rachael Ray recipes in 30 days, is amazing and will join the list with my other favorites!! This was adapted from an October 2012 issue of Everyday, and I may be biased by I think I did a better job with it. 

The tender crisp veggies, melted cheese, caramelized bits of sausage, and the cream sauce just hugging the pasta is simple and memorable. Not bad for a 15-16 minute recipe from start to finish - that includes waiting for water to boil. I lightened it up from the original ditching the heavy cream, and added more veggies so go ahead and make it, feel good about your food and your body. We all need good food to fuel us, to get stuff done, to maintain life and mental stability, and to have good attitudes. Be balanced and try some yummy pasta and veggies on a crisp fall day :)


Kale & Zucchini Sausage Pasta
serving size is 3
prep + cooking time: approx. 15 minutes

Ingredients:
1/2 lb fettuccine noodles
1 shallot, finely chopped
1 clove of garlic, finely chopped
4 oz (half of a small block) of mozzarella cheese
2 zucchini's quartered and finely diced into diamond shapes
1/2 bunch of kale approx. 4-5 leaves, stems removed 
1/2 cup of half and half
1/2 lb of mild ground sausage
1 tsp flour
salt & pepper to taste
fresh basil (optional)

Directions: 
Step 1: Bring a large pot of water to boil and add 1-2 Tbs salt

Step 2: In a large skillet start browning the sausage over medium heat. I didn't need to add oil since I was using my cast iron pan but if you need to help it olive oil would be a good touch. When it looks about half way done, add in the zucchini, garlic, and shallot. 

Step 3: Once water is boiling cook the pasta as per directions on your box. Once pasta is done, drain it, and return it back to the pot. Keep 1/2 cup of the starchy cooking water.

Step 4:  Sprinkle the flour over the sautéed veggies, and let it cook for about 1 minute or so stirring. Then add in the starchy cooking water and the half and half. Bring to a simmer and let the liquids reduce by half (takes less than a minute). 

Step 5: Add the kale to the skillet with the sautéed veggies. Remove the pan from the heat. Mine looked like the kale wasn't going to fit in the pan but it only took about 30 seconds to wilt. The dish is now ready to combine. 


Step 6: Toss/Pour the sauced veggies into the pot with the pasta and marry the flavors together.

Step 7: Grate or Shred the cheese over each bowl and top with fresh basil (optional)


What a fun way to eat kale & zucchini :) 
From my kitchen to yours


Wednesday, October 9

Whole Wheat Three Cheese Kale & Sausage French Bread Pizza


We have been doing pizza pretty regularly since football started 4 1/2 weeks or so ago. I am hanging in my fantasy football league but beginning to HATE my defensive line/special team. Never EVER picking the Giants again. Sigh. okay. food. Pizza. Please ignore that. It was a tough weekend for me.  

If you, like me have never had kale on pizza before you might be pleasantly surprised. Honestly, my husband tolerated it, but my son and I ate it just fine. Actually, I thought it was amazing. But I eat green veggies all the time so warning to those this may be an acquired taste. Heck though if I could get my family to eat one of these pizzas twice a football season I think I would be feeling really good as a mom. 

This is one of the really approachable recipes because it starts with a store item = french bread. With the three melted cheeses, and crumbled sausage bits, and crunchy bread it might become one of your favorite pizzas too.  Dinner done in 20 minutes isn't a bad way to go either. Recipe was adapted from September 2012 Everyday Rachael Ray magazine. I used a different set of cheeses and made it a bit more family friendly. This is recipe number 13 of my challenge to make 30 Rachael Ray recipes. 


Ingredient list:
1 loaf of whole wheat french bread
1 lb of lean pork sausage
1/2 cup of red sauce (or your favorite pizza sauce)
1 oz thinly sliced or grated parm (about 1 handful)
2 oz of smoked Gouda cheese thinly sliced (about 8 thin slices)
1 cup of shredded mozzarella cheese
4 large kale leaves (stems removed)
2 Tbs chopped fresh thyme
salt & pepper (see below for amounts)
1/2-1 tsp oil 

Step 1:  In a large pot bring water and the kale to a boil. You want the water to be barely touching the kale about half way. Add 1/2 tsp salt. Cook it for 2 minutes on medium with a steady simmer of bubbles. 

Step 2: While kale is cooking. Grab a bowl and fill it with ice and water. You are going to immediately transfer the cooked kale to the bowl with a slotted spoon to stop the cooking process. Blot it with some paper towels or wring it out in paper towels to remove excess water. Set it aside.


Step 3: Preheat your oven to 400. 

Step 4: Cook your sausage with 1/2-1 tsp of oil and 1/2 tsp salt and 1/4 tsp pepper. Should take about 5-6 minutes using a spoon or spatula to crumble it into small pieces. Have a paper towel lined plate to transfer it to, to cool slightly before adding it to the top of the pizza. 


Step 5:  Cut your loaf of bread open and place on a baking sheet. Start layering your ingredients on both sides. Spread the pizza sauce. Sprinkle the grated or sliced parm. Layer the sliced Gouda next approx 4 pieces per loaf. Layer the kale next slightly pulling it apart into pieces for easier eating. When the sausage is done, add that to the top of the kale. The mozzarella cheese & thyme is last but not least. The fresh thyme really is a fall smell for me and brings everything together. 

Step 6. Bake for about 10 minutes until it is golden, bubbly, and delicious looking.  Let it cool slightly before serving. 


Enjoy football and fall :) 
Happy pizza/veggie eating 
from my kitchen to yours

Monday, October 7

Grilled Chicken Broccoli Bowls (Take Out Fake Out)

Happy Monday to you. So do you have a favorite take out dish? I must admit when thinking about take out I think about stuff I never let myself eat like orange chicken or beef & broccoli. That stuff tastes so good but my stomach just doesn't like me afterwards so its probably been 2-3 years since I have had it. That doesn't mean I don't crave it though.... So in response to my craving I made this. Being fall in southern Arizona it is the perfect time to grill indoors or out so I modified the recipe to reflect that, and added my own touches like extra onion, sesame seeds, chicken breast instead of chicken thighs, raw almonds, less amount of oil, ect.... 


It is an easy 30 minute meal (some of it can be made in advance if you chose to save some time). My family tried it yesterday and liked how it tasted like good take out minus the grease and delivery charge. Nothin' spectacular but it was relaxing to just hand everyone a bowl they could comfortably eat and watch the football game(s). Family approved. Kiddo friendly (thanks to the sugar I am sure wink wink). In my challenge to do 30 new Rachael Ray recipes in 30 days this is recipe number 12 taken from February 2010 magazine issue. It is easy, pretty fast to throw together, and uses fresh healthy ingredients. 

Note: I would've used brown rice but only had white. Feel free to use whatever you have in your pantry.


Grilled Chicken Bowls
Serves 4 
cook + prep time: approx 30 minutes


Ingredient list:
1 1/2 cups of rice, brown or white
3 cups of chicken stock (I used homemade)
4 chicken breasts halves, pounded slightly thin
1 bunch of broccoli (approx 1 1/2 cups), chopped
2 green onions, thinly diced
1/2 white onion, finely diced (2 stalks of celery or 1 leek would be a good sub or addition)
1 cup almonds, raw, roughly chopped
1/2 Tbs worcestershire sauce
1/2 Tbs mirin
1/4 tsp salt
1/4 tsp pepper
1 tsp dried rosemary
2 Tbs soy sauce, low sodium
3 cloves of garlic thinly sliced
1 1/2 Tbs cornstarch
2 Tbs sugar
1 Tbs olive oil
2-3 Tbs roasted or toasted sesame seeds
Optional: Soy sauce for serving

There are lots of little steps to this dish but they are all pretty easy. You can do it. 

Directions:

1. In a medium size bowl or gallon sized freezer bag combine the ingredients to marinate the chicken (this can be done in advance and stored covered in the fridge & I suspect it can be frozen but haven't tried it for sure yet). Whisk together half of the garlic, all of the soy sauce, sugar, 1/2 Tbs of the cornstarch, mirin, and worcestershire sauce, salt, and pepper.  Whisk all the ingredients then add the chicken and let it sit in it for 20 minutes. Turning it over half way through to fully coat the chicken. 

2. While chicken is marinating, heat a small-medium skillet over medium high heat and toast the raw almonds for 3-5 minutes. The pan should be empty just almonds. Pretty easy just don't walk away from the stove. Trust me. Burnt almonds = yuck! As soon as you can smell them, or grab one & carefully and taste it, and it seems done, it probably is.  Remove them from the pan and put them in a small bowl. 

3. While almonds are toasting, start your rice. Put all of the chicken stock/broth and rice in a pot and turn it on high until it starts to boil. Reduce heat to low, and cover for 12-15 minutes if making white rice. Otherwise follow the directions on your package for any other kind. Let the rice sit for a 5 minutes and then fluff it with a fork. 

4. In the same pan you toasted your almonds in, put 1/4-1/2 cup of water and all of the broccoli and dried rosemary. Cook it for about 3-5 minutes on high. It should be boiling but the water should not even come up to half of the vegetable. You want it to boil/steam itself to tender crisp. When the broccoli is done, remove it from the pan, 
dump the water out and dry it out. 

5. While rice and broccoli are cooking heat up your indoor grill pan or outside bbq. Pull the chicken out of the marinade and on to a plate or bowl. Remove any garlic pieces that may have gotten stuck to the outside of the chicken these will burn if you don't. Burned garlic = yuck. 

6. Grill your chicken for 5-7 minutes each side. Don't move it around to avoid ripping the thin chicken breast. Once the chicken is ready to be turned over you will know because it will have loosened itself. You can test this by picking up a corner of it. If its easy to lift up the corner, flip it. If you feel like you have to yank or pull it leave it be. Leave the force with Luke. No force needed with chicken. 

7. Heat the olive oil in the same pan you just used for the broccoli (trying to save on clean up later - can you tell?). Add the white onion and sauté for 3-5 minutes. Add in the remaining garlic and sauté for 2-3 minutes watching so it doesn't get dark. 

8. In a cup combine the remaining cornstarch (1 Tbs) and 1/2 cup of water. Dump this mixture into the onions and turn the heat to low. Add the broccoli back in and cook for another 2 minutes while the sauce thickens up. 

9. Serve up the food. See picture below. First a scoop or two of rice goes into each bowl, then the broccoli mixture, then grilled chicken cut on a bias or chopped for kiddos, then green onions for freshness, crunch & color, last but not least sprinkle on the toasted nutty almonds and roasted/toasted sesame seeds. 


Great easy dinner. Took lots of steps to explain it but the flavor combo will win you over and you might even not grab take out the next time you are craving it, and use boneless skinless healthy chicken and broccoli instead. In our house I added some soy sauce to mine but thats just I do that with most dishes like that.... optional.  
from my kitchen to yours