Showing posts with label zucchini. Show all posts

Saturday, August 24

Mini Maple Muffins - the CUTEST way to jump into fall

This is only my second fall season in upstate NY but even I can see that maple and apples are a HUGE thing here. Probably... because instead of being in a big city surrounded by skyscrapers we are in a beautiful countryside. Anyways. If you have the privilege of going to a maple farm - its awesome. You should. And if you can't, you should at least treat yourself to as many maple fall things, as humanly possible. You owe yourself at least that. I am just looking out for you. And if I am not being too forward you should starting with this super easy 20-22 minute recipe that so easily fits into your hand, your mouth,and your heart. They are so little and cute (and ahem healthy - but no one would ever guess that this is a zucchini carrot recipe). 
Shhh... These are fun MAPLE treats ðŸ˜‰
Recipe adapted from: Graceful Little Honey Bee 


Short Ingredient List: 
1/2 cup whole wheat pastry flour or all purpose
1 cup all purpose flour
1 & 1/2 cup of finely shredded zucchini
1/4 cup finely shredded carrot
1/2 tsp baking powder
1/2 tsp baking soda
1 tsp ground cinnamon
1 small container plain greek yogurt
1/2 tsp salt
1 & 1/2 tsp vanilla 
1/2 cup of sugar (for a sweet muffin - for not so sweet use slightly less) 
1 egg
2 Tbs good quality maple syrup
optional: turbinado sugar to top 


Easy directions for an Easy fall 

Spray a mini muffin pan with nonstick spray

Preheat your oven to 350 degrees. 

Use a paper towel and wipe the extra spray off and/or run your finger around each hole in the muffin tin to make sure its evenly coated - this extra step will just make sure its easy. 

Mix everything together in a large bowl. Starting with the egg and sugar to make sure the egg is beaten. 

Scoop the batter into the prepped mini muffin pan. If you don't have one, they are everywhere you can buy baking dishes. They will up your breakfast game plan especially if you have kids, for these are so much better sized for little fingers. (ahem or putting into hands as kids run out of the door for the school bus - don't you love fall) 

The batter should give you 20 - 24 yummy fall treats filling the wells 3/4th full. 

Top with turbinado sugar if you are using.... mini mms or mini chocolate chips would also taste good. You are getting your kids to eat 2 veggies here why not splurge a little. 

Bake for 10-12 minutes. Let it sit in the tins for 5 minutes. Then move them to a cooling rack! I like to cover them with a paper towel or clean kitchen towel to absorb extra moisture.  


See. Easy to make. Easy to eat. Enjoy! 

Friday, September 2

Veggie Burritos with Zucchini Guacamole

Hello September. I love you September. We are almost in my fav season of the entire year. Almost... It was still 100 degrees F at my house today but the end is in sight. Yay! If you are still in the trenches of the end of summer I got the perfect meal for ya. Keep reading. Its good. I promise.

 On warmer days or all summer long I often go for lighter dishes that require less heating up the kitchen you know like having a sandwich night. This burrito definitely fits the ideal and is a great use for leftover beans and rice from other yummy Mexican meals. 


Picture layers of crunchy & creamy guac with hints of citrus, fluffy brown rice and filling nutritious black beans, crisp lettuce, with smoky melted cheese wrapped up in a oversized tortilla wrap. Yum! It tastes so good you won't even care that its healthy. SO many fresh flavors and fun textures. 

But the real reason you should make this is because the zucchini, freshly and very finely diced, adds another flavor of freshness I have never had in guacamole before and actually never had it raw before. It makes this guacamole stunningly good. You don't taste it and say "oh I taste zucchini" but it does stop you in your tracks and say "wow that tastes bright and fresh". I love guacamole and I have had EVERYWHERE. Trust me. This might be the best I have ever had (ahem except the one I already have on this blog with bacon it in... okay I have a soft spot in my heart for yummy salty bacon). Seriously if you don't make the burrito you gotta try this guac with your next bag of chips, cut up veggies, tacos, quesadillas.... or just with a spoon? 

For a fun kid friendly variation you could even add some crunchy chips or fried corn tortillas cut into strips into the burrito. The veggie burrito idea comes from  Naturally Ella I just edited it a bit because I lived in cali for 8-9 years and you can't make guac without a chili pepper. Its just the way it is. So I am passing it on with a few helpful touches. Check it out. 


Veggie Burritos w/ Zucchini Guac


cooking time + prep = about an hour*
*If using already cooked brown rice this time is shortened to a very quick 15 minutes!

Makes 2 large burritos 
(my kiddo was full with half of one with a handful of tortilla chips) 
Would be great with a piece of a corn on the cob

Ingredients:
  • For the guac:
  • 1 & 1/2 ripe avocados
  • 3 Tbs finely diced red onion
  • 1/4 cup minced cilantro
  • 1 clove garlic, minced
  • 1/4- 1/2 teaspoon salt
  • Juice of 1 lime
  • 1 Tbs lemon juice or half of a lemon juiced
  • 2 Tbs orange juice or juice of half of an orange 
  • 1/2 of a medium zucchini very finely diced (about 1 cup) 
  • 1/2 of a poblano pepper (for mild) or half or whole jalapeño pepper with the seeds and membranes removed (for more heat) finely diced

  • For the burritos: 
  •  2 large whole wheat flour tortillas or spinach ones* (as seen in the pic) 
  • 1/2 cup cooked brown rice
  • 1/2 cup cooked black beans, drained and rinsed if using canned
  • 1/2- 3/4 cup shredded Smoked Cheddar or Smoked Jack cheese (I used 1/2 cup but was not very cheesy if you want a stronger cheese taste go for 3/4 cup)
  • 1/2 cup shredded or very finely sliced ribbons of lettuce
optional: A diced up roma tomato and a handful of sprouts would be awesome additions I just didn't add in but will next time. 
*Whole wheat would be healthier but I was just using up what I had on hand... sadly the spinach ones weren't as healthy as I thought they would be, despite the name

To assemble:

1. Make the guacamole.  Add all the ingredients into a bowl starting with the avocado so you can use a spoon to get the avocado out and a potato masher or a fork to get it to the consistency you like - chunky or smoother. Taste as you go to get the right amount of salt and heat - chili's differ in heat so I always do half the amount the recipe calls for, taste, and then add the rest if I want to. 

Tip: You can always increase the heat but its very hard to subdue it afterward. If you do find its hotter than you thought add more sweet things like a 1/4 tsp of sugar or more citrus juice and serve it with sour cream. Dairy and Sugar are good counterparts to heat. 


2. Assemble the burritos. In any order but this worked well for me:
1/4 of guac on each one
1/2 of the beans
1/2 of the cheese cheese
1/2 of the rice 
1/2 of the lettuce
3. Roll up the burritos tucking in the ends, and heat them in a dry pan over medium heat until they warm up completely and you get some nice brown spots on your tortilla. That will help melt the cheese, bind everything together. This took about 5 minutes for me. 
4. Serve them with some tortilla chips, or corn on the cob, and/or salsa with the remaining delicious zucchini guacamole. 
5. Enjoy the rest of you day... and possibly eat dessert because not only did you have an amazingly tasty meal you ate incredibly healthy! 

Thanks for stopping by my Arizona kitchen
Stephanie

Saturday, August 6

My top 7 zucchini recipes - Happy Fall (Almost)


Zucchini! I mean Fall! 

Yay fall is almost here! (just don't look at the temperatures here in southern Az). School has started. To me Fall definitely means some fine food flavors are ready for picking and eating pumpkin and zucchini are my top favs. Football is starting. I may be jumping the gun just a little bit but I just can't wait any longer. Anyone who knows me really well knows I love zucchini. It is my "go to" healthy addition to most recipes. I add it into everything. Really. Cinnamon rolls. Chili. Any pasta dish. Yup I even sauté it up plain with s & p for breakfast or lunch.

So here are my top zucchini recipes to help you start using up celebrating the end of another hot summer with all those end of the season lovely green veggies. Eat your veggies while you enjoy the end of summer. Sorry if I sounded like a mom just then. Happens. Plus in most of these delicious eats you don't even notice its there, which means you can still serve a vegetable on the side and no one will even know but you. I say most because in the last recipe you will know its there but the sauce is so amazing you won't even care. Seriously. Super secret mom stuff. 

Click on the name below the picture to get 
to the recipe.


 #1 most kid friendly zucchini recipe: Juiciest zucchini cheeseburgers 


#2 most kid friendly zucchini recipe: Zucchini hamburger helper


Quick zucchini asian beef bowl   (recipe most requested by my family)


Thanks for stopping by to see these yummy and healthy eats. 

Stephanie

Thursday, July 28

Zucchini Hamburger Helper (from scratch)


Howdy. Its hot today. It was hot yesterday. Heating up the kitchen is not something I am fond of in the hot southern Az summer so this 20 minute family favorite is the top of my "go to" summer dinner list. Its healthy, easily flexible use whatever milk product you have, whatever cheese you want, any sort of ground meat, and it always comes out amazingly flavorful and kid friendly. Plus it helps my very sweet husband retain some of his childhood memories of eating the kind from the box because I am not buying the box stuff. 

I heart zucchini. Its my healthy favorite vegetable. Whenever I want to make something healthier I add in zucchini. In the summer, this lovable green vegetable are huge, yummy,  and super cheap. I changed this recipe up from the original by adding in zucchini, more pasta, more cheese, and switching to a whole grain pasta. Check out these meaty and cheesy pics and the recipe below for a great meal.  


Zucchini Hamburger Helper (from Scratch)
Serves 4-5 
Adapted from this really great blog: Farmgirl Gourmet


Ingredients:

1 lb ground beef (I used 85%) but ground turkey works well too
1 large zucchini or about 2 cups worth, diced into small sized cubes (for kids and husbands)
2 1/2 cups of milk (I used 2%)
2 1/2 cups of hot water
3 cups of whole grain elbow pasta
1 Tbs cornstarch
1 Tbs chili powder
2 tsp garlic powder
1 tsp sugar
2 tsp salt
1 tsp smoked sweet paprika
1/4 tsp or a pinch of red pepper flakes
2 1/2 cups of shredded cheddar cheese (seriously any kind of great melting cheese is good)


How to make it: 

1. In a deep pan with a lid, start cooking the meat over medium heat. Add a little oil or butter if you need it. 
2. When the meat is almost cooked all the way through add in the zucchini and sauté for a couple minutes breaking up the larger pieces of meat as you go. 
3. When the meat is caramelized and cooked all the way through and the zucchini has a bit of color on it, add in everything else except the cheese. Stir so the spices get evenly distributed.   
4. Bring the pan and contents to a boil, then reduce to the heat to low, cover with a lid, and simmer for 10-12 minutes. t will look super soupy like you added too much liquids but don't worry. It will thicken. Mine was good at 11 minutes. 


Hint: Pasta can be tested to see if its done two ways. You can taste it. Or you can break or cut it open and if there is no white on the inside then it is cooked. 

5. Turn the heat off on the pan when the pasta is cooked to your liking. Stir in the huge mound of yummy cheese and as soon as its melted about 37 seconds later. Serve it up and enjoy! 

Sunday, May 1

Veggie Sausage Rice Skillet

Yeah it has been awhile since I have posted new content. BUT. After 7+ long months of being absent from new recipes, I had to share this one. This one saved my evening. I made this easy skillet one pot (sort of) thing for dinner tonight, and the result was like a locust swarm descended upon my kitchen table. Usually that means:
a) I should make this again, 
b) it tastes good, 
c) my two little guys are in the middle of a growth spurt, 
d) all of the above.... 
(ding) the correct answer is D

So I have two growing boys, and a husband who doesn't really care for sandwiches. He says they aren't really filling. yada. yada. yada. Then of course it has to be somewhat toddler-friendly. Sometimes cutting things very small works for him. Sometimes it fails in a really bad... wait for it.... let-me-throw-food-at-you-and-all-over-floor... type of way. Hello parenting. Then he cries because he's hungry and I just give in to whatever he'll keep down like crackers and cheese. 

P.S. If you are wondering...I have been making my top 5 of my favorites over and over again. Repetition is one of the keys I found to surviving having a newborn and teething not sleeping adorable baby. Here are some links to my favorites. You def should try these. 

Black Refried Beans (from scratch),
and 


After all that.... here's that previously mentioned lifesaver recipe. Super easy to follow. Super easy to make. Tons of healthy veg cleverly hid under a ton of cheese. Great for kids and tired parents :) Enjoy.


Veggie Sausage Rice Skillet 

Serves 4-6  Total time 20-25 minutes
recipe adapted from hillshire farm magazine advertisement

Ingredients
1/2 red pepper, diced small
1/2 onion, diced small
small can of tomato sauce
1/2 cup water
1/2 tsp salt
1/2 tsp oregano
1 zucchini, diced small
2 and half - 3 cups shredded mozzarella cheese
1 pkg of frozen broccoli, defrosted or not (if you forget)
3 cloves of garlic, crushed
1 & 1/2 pkg of beef smoked sausage, diagonally sliced
3 cups of white or brown rice cooked

Easy Directions with matching pictures: 


1. Heat the olive oil and lay sliced sausage down in a deep skillet. Over medium heat brown the sausage. If all the sausage doesn't fit no worries just push it to the side when you see color to make room for the rest. After one side is browned on most of them continue with step 2.

2. Lower the heat just a little and add in the garlic and cook for about 30 seconds. Stir often. 

3. Add in the red pepper. 

4. Add in the onion. 

5. Add in the defrosted broccoli

6. Sauté all the veggies together for approx 10 minutes until veggies are tender crisp. 

7. Add in the tomato sauce, seasonings, and water. Stir again. 

8. Add in the cooked rice. Stir really really good. 

Note: If you don't have any leftover rice. Just start some white rice on the stove when you start the recipe and it will be done in time to add it here. Or cheat and use the microwave stuff. I think I have heard some good things nowadays about brown rice.

9. Sprinkle the cheese over the entire skillet and serve it when the cheese is melted.   


That's all folks
Take it easy


Thursday, May 21

Juiciest (Zucchini) Cheeseburgers Ever


The sun is out, the baseball game is on, my family is home, and burgers are on the grill. Perfection my friend, let me take a moment to tell you about these amazing burgers. You have to try them! They are loaded with flavor and a surprise. What surprise? You ask. A vegetable, I reply. You know me. I am always looking for a better, healthier way to eat something I love. If I can figure out how to get double the amount of veggies into pizza and burgers - that means I get to eat them more often. Heck yeah. See its not really a mom thing, its a I-love-pizza-and-cheeseburgers-thing. Super scientific. 

I know everyone isn't vegetable-centric like me (even adding zucchini and carrots into chocolate chip cookies - truth), but by adding this mild tasting vegetable, once cooked you can't tell its there, AND gives the lean meat some much need moisture - you'll end up with the juiciest burgers in the world! 


My cheeseburger with sliced juicy tomatoes, fresh crunchy spinach, lots of mayo and mustard 

So I have this thing with eating rare ground beef. Its not the trendy or even what is happening on tv with cooking shows. But I just can't. Steak is another subject entirely. So in my house I always cook ground meat well or well done. It seems safer to me. So that being said, sometimes we ummm have some pretty dry burgers. I hate admitting to real life stuff like this but I can picture how many times ketchup is poured onto burgers to help make them juicier. Sigh. But, alas, this burger I made tonight needed no such help. And yes it was cooked well done. Zucchini is the star secret vegetable that no one will be able to guess, but will make even a well done burger seem like a million bucks. 


Other reasons to make this burger include the idea that you get 5 huge burgers from only 1 lb of meat, which should save $, it will save you some calories, and increase your intake of vitamin c, vitamin a, calcium, vitamin b-6, iron, fiber, and magnesium - all things found in zucchini. Sounds tastier than that mineral-y tasting multi vitamin.... So so make it already. 

Juiciest (Zucchini) Cheeseburgers Ever
Recipe adapted from: Skinny Taste
Makes 5 Burgers 9 (4-5 oz each)
Prep time + cook time : 10 minutes

Ingredients
1 zucchini grated on a fine grater into a clean kitchen towel 
(so you can wring out the water)
1 lb lean ground beef (also good with ground turkey)
1/4 cup of panko bread crumbs
1 tsp kosher salt
1/2 tsp ground pepper
1/2 tsp ground garlic
1 Tbs red onion also grated on a fine grater
5 slices of cheese, I used colby jack - but use your favorite
5 whole wheat buns
Additional condiments: ketchup, mustard, lettuce, fresh spinach, sliced tomato......
Olive oil

Directions:
1. Mix everything together in a mixing bowl
2. Form 5 patties
3. I put a few drops of olive oil on the formed patties to help them not stick on the grill/bbq
4. Cook them for approx 7 minutes over medium. 
5 Once you flip them once put the cheese on top to give it time to melt. 
6. Put the buns on the grill soon after that to toast them up. 


Serve with watermelon, chips, potato salad, corn on the cob or any 
other summer time favorites
From my delicious Az bbq to yours! 


Sunday, October 27

Bacon Zucchini Chili & Book Review


Bacon is dynamic. It can turn any mundane entree into something spectacular and memorable. Bacon is a popular thing to find on pintrest, and on most blogs including mine. Recently, I read a library book titled Bacon: A love Story by Heather Lauer, . I wanted to share the book with you because it made an impact on me. It's always fun to find a cookbook. But it's a surprise to find a cookbook and good recipes within a book. This is one of those. You can acquire it easily on amazon if you search the author's name. Please note I have never met, nor heard of the author before, and am not receiving anything for reviewing this book. I just love eating bacon, and the book looked interesting. 

Book review: I give it a "B-". It is an easy read, high school reading level, easy font, with minimal illustrations. Lauer's book is 100+ pages, and took me about a week to finish reading at a moderate speed. The pace and feel of the book is slow, perhaps due to the disorganized feel of the chapters, and repetition of similar information. I didn't feel compelled like some novels to not move until it was finished. But neither did I stop reading because I liked the fun facts, and the historical anecdotes that made me laugh. It was a relaxing read, something that didn't require my intent 110% concentration. We all need mini literary vacations. Lauer's book goes into deep insightful descriptions of the pork smoking process with real quotes from smaller family owned operations, and obtains bacon recipes from real hotels, shops, and restaurants from all over the country! Most of the recipes scattered throughout the book looked great, although about 50% seemed inapplicable to me, because of the lack of family friendly-ness. Many recipes seemed a bit too elevated or elegant for my little family and country cooking. I strive for good family recipes in real life and my blog. If you are curious about bacon at all, you should read this! But warning - you may find yourself buying more bacon the next time you go shopping as a result. After reading it I bought peppered bacon for the first time ever. Peppered bacon is so good, I had no idea, and I have this fun book to thank! 

As with most bacon lovers, I don't think bacon can be overdone. My best experiences to date with bacon have been bacon cinnamon rolls with maple frosting from Dorothy at Crazy for Crust, an epic egg topped, maple syrup candied bacon cheeseburger, homemade bacon mayo, and now this super yummy, flavorful, and non spicy bacon zucchini chili. I feel bad for always making my chili rather heated so I really made sure this one was toned down. Turns out that because I toned down the heat, the flavors really came out swinging. This new recipe is now tied with my other favorite chili, the yummy apple chipotle one I did last fall. Chili is such good, fall, cold weather, football food. I need to make that again :) 


Here's what you need to make my Bacon Zucchini Chili 
(inspired by Lauer's book)
serves 6-10 depending on portion sizes
 freezes beautifully
cook + prep = 30-45 minutes


Ingredients:
3 1/2 cups low sodium beef broth
1/2 Tbs chili powder
3 cloves of garlic, minced
1 medium white onions, finely diced
2 cans of organic black beans (15oz each)
2 medium zucchinis diced to size of your personal preference or shredded (mine measured out to be 2 cups worth)
1/4 tsp smoked paprika
1/4 tsp ground cinnamon
5 pieces of pepper bacon (little less than half a package)
1/2 lb of ground beef
2 dried bay leaves
2 cans of fire roasted tomatoes (15oz or approx)
1/2 Tbs Mexican dried oregano
1 orange, scrubbed, and cut in half (adds special touch)
2 cups red veggie sauce (click on title for recipe)
1 Tbs kosher salt
1 1/2 Tbs ground cumin

5 Easy Directions:

Step 1: In a very large pot cook the bacon. Drain half of the fat out. 

Step 2: To the pot add the garlic and onion and saute them in the remaining bacon fat. 


Step 3: When the onions are translucent, add in everything else except the beans. Simmer covered for 30 minutes covered over medium low. I added my red pasta veggie sauce straight from the freezer & freezer bag since there is enough liquid in the recipe help it defrost quickly in the large pot. 

Step 4: Drain the beans and rinse extra salt off. Add them to the pot. Remove the bay leaves and the orange halves. 

Step 5: Taste and adjust seasonings as needed. Serve once the beans are hot. 

Good sides: crackers, corn bread, corn on the cob

Fun chili toppings: oyster crackers, fresh green onion, green peppers, green chilies, diced jalapenos, sour cream, fresh tomatoes, shredded cheddar or pepper jack cheese for a kick


I apologize I don't have more than 1 picture for this recipe. It was so easy and most of it was just dumped into 1 pot thus multiple pictures seemed redundant. 
Hope you enjoy this easy fall/football meal! 
from my kitchen to yours

Thursday, October 24

Cardamom Zucchini Cinnamon Rolls with Maple Frosting (updated freezer instructions Nov 11,13)


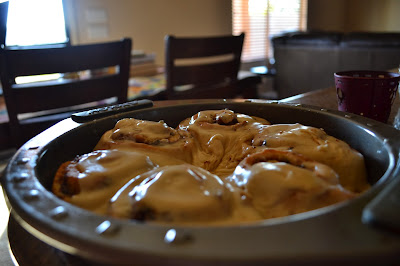
I have been on a zucchini kick for a little while. So... before I dive into the second half of my Rachael Ray list I wanted to share with you an awesome gooey & delicious zucchini cinnamon roll recipe. This mouthwatering recipe is amazing! You can make it the night before, throw it in the fridge, and bake it the next morning. There is no reason to get up at 5 am to get these done in time. Or you can make it on the sunday night (thinking that you are being clever), forget to bake them on Monday, run out of time on Tuesday, and they will turn out great on Wednesday. Truth: in my crazy household these beauties hung out in the fridge for 2 days. If you want to plan ahead on purpose you can freeze a batch for up to a month - probably longer - I just haven't tried longer than a month. Anyone who has cinnamon rolls in their freezer for longer than a month has more will power than I do! The texture of the dough is fluffy, moist, tender, and incredible. Pair it with some sweet maple frosting and your morning and coffee - its like christmas in your kitchen. 

I was so relieved when the cinnamon rolls from the freezer rose and baked properly because that means no more huge pans of cinnamon rolls around my house. I can make batches of my favorite rolls, and freeze the extras. I have made this recipe 4 times since I found it earlier this year. Happily, the whole wheat flour and extra zucchini makes it a bit healthier. I hope you enjoy this recipe as much as I do! 


This picture is a half of a batch. So good!!!

Cardamom Zucchini Cinnamon Rolls 
with Maple Frosting

makes 12 in the whole batch - easily halved or doubled

recipe adapted from creative blogger crazy for crust
You should absolutely make her bacon cinnamon rolls!


Ingredients for the dough:
2 1/4 tsp active dry yeast (one packet)
3/4 cup of warm non-fat milk 
1/3 cup of white sugar
3 Tbs butter, unsalted, softened
1/2 tsp salt, 
1 egg
1 1/2 cups of all purpose flour
1 1/2 cups of whole wheat white flour
1/2 tsp ground cardamom

Ingredients for filling: 
1/2 cup of butter, unsalted, softened
3/4 cup of brown sugar
2 cups of shredded zucchini, water squeezed out
2 Tbs whole wheat white flour
2 Tbs cinnamon
1/4 tsp ground cardamom

Ingredients for the frosting:
1-2 Tbs nonfat milk (or whatever kind you have)
6 Tbs butter, unsalted, softened
2 cups powdered sugar
1/4 tsp maple extract (light hand = super strong)
2 Tbs pure maple syrup
1 tsp vanilla extract


Directions for the dough:
1. Heat the milk in a cup in the microwave for approx. 25-45 seconds aim for 120 degrees.

2. Add the yeast to the cup and stir. Let it sit and for about 5 minutes to get cloudy and foamy (activating the yeast). 

3. In a mixer bowl or large mixing bowl cream together the sugar butter, salt and egg. It may be slightly chunky thats okay.

4. Pour the yeast mixture into the butter mixture. Stir or mix on low for about a minute. 

5. Add the flour and ground cardamom slowly over low or medium mixing speed. If you are using a stand mixer use the paddle attachment until the dough starts to stick to the paddle then switch to the dough hook. Using a dough hook over low speed continue mixing until the dough forms a ball in the middle of the bowl. 

6. While the mixer is mixing spray a large bowl with nonstick cooking spray. Put the dough ball into the bowl and cover the bowl with plastic wrap. Let it sit for 1-2 hrs while it rises. It should double in size. 

Making the cinnamon rolls:
1. Shred your zucchini and wring it out with a towel or strong paper towels over the sink. Its amazing how much liquid this veggie has! Note (from experience) if you use a towel the liquid that comes out is green and it may turn your towel green - don't use a white one. 

2. In a bowl combine the filling ingredients the zucchini, brown sugar, butter, flour, cardamom, and cinnamon. Stir until it forms a paste. 

3. Once the dough has risen, sprinkle some flour onto your work area or counter. Roll the dough out to a large rectangle. 

4. Spread the filling out evenly over the entire surface. 

5. Roll up the dough into a log as tight as you can. 

6. Slice it in half and with each half make 6 cinnamon rolls for a total of 12. 

7. Spray a cooking pan with nonstick spray and place them side by side giving them a little room because they will rise considerably. I use two round cake pans for this. Wrap the tops with plastic wrap. 

8. If you are baking them immediately let them rise on the counter for a second time for 30 minutes - 1 hr. They should be large and fluffy. Note: They will not get much bigger than they are when you put them in - so while I write 30 minutes in the directions I recommend 45 if they are looking small or your kitchen is cold. 

9. Bake at 350 for 20 minutes or until golden brown. 

10. Whip up the frosting. Combine all the frosting ingredients in a mixer and mix away. Add more milk if needed. The texture should be creamy but not runny. If it seems stiff and hard to spread then add 1-2 Tbs additional milk. 

11. Spread the frosting over the cinnamon rolls the moment they come out of the oven. Let it melt and get in all the cracks and get super gooey. 

12. Enjoy warm with your fav people and coffee (of course)


How to do the make ahead part:
Follow up to step 8. Complete step 7, and put them in the fridge until the morning you are going to bake them. If you are putting them in the freezer I highly recommend double wrapping them with plastic and then with foil just to be sure. Use a post it note or a piece of paper with a marker to label them with the cooking time and temp for easy baking later.

Baking frozen cinnamon rolls
Pull them out of the freezer and let them fully defrost in the fridge overnight. The morning you want to bake them, grab a baking dish, and fill it with water. Put the cold pan of water in the oven on the same level as the cold pan of cinnamon rolls you have in the fridge. Let the rolls rise in the oven at 170 degrees for 20 minutes. Check on them. When they are big and fluffy start baking. Increase the oven temperature, you don't have to take the rolls out of the oven, and bake for 18-20 minutes until they are golden. While they bake make the frosting - super easy 3 minutes :)


I love this maple frosting! 


from my kitchen to yours